


Swiping up on your home screen on iPhone brings up the control center which gives you access to key settings and shortcuts to launch key apps. You may want to disable swipe-up as it can get in the way of your gestures, e.g. if you’re a gamer.
Unfortunately, you don’t have the option to turn off swipe-up to bring up the control center on the home screen in iOS 11 and later iOS versions. You can, however, turn off swipe-up control center on the lock screen and within apps.
- Turn off swipe up on lock screen & in apps
- Turning off swipe between apps
- Turning off swipe to go back
- Disabling iOS lock screen Swipe Left Camera
- Disabling swipe down and up menus
- Turning off the Swipe keyboard feature
- Turning off volume swiping
- Removing swipe-up after FaceID unlock
- Turning off multi-finger swipe gestures on iPhone
- Creating custom gestures on iPhone
- Disabling iPad gestures
Turn off swipe up on lock screen & in apps
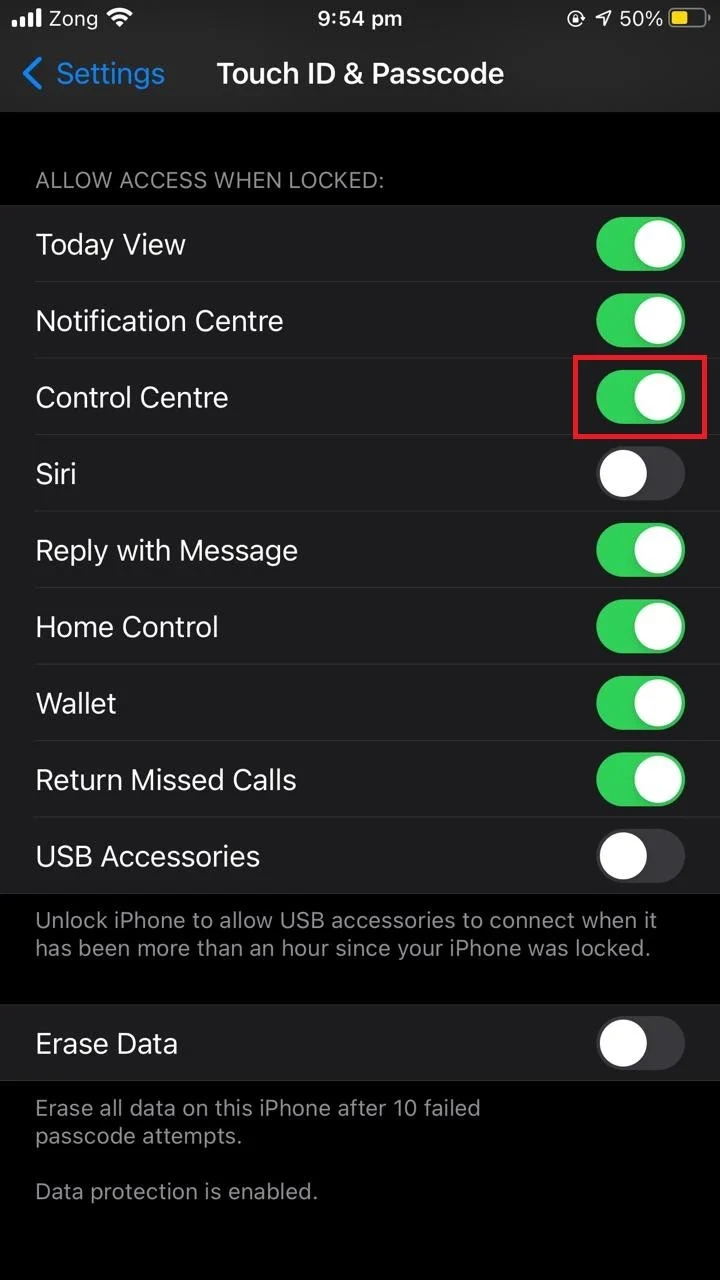
1. Lock screen
To turn off swipe up control center option on the lock screen of your iPhone, open Settings > “Touch ID & Passcode” (on iPhone 8 plus and below versions) or “Face ID & Passcode” (on iPhone X and later versions). In the section “Allow access when locked”, toggle off “Control Center”.

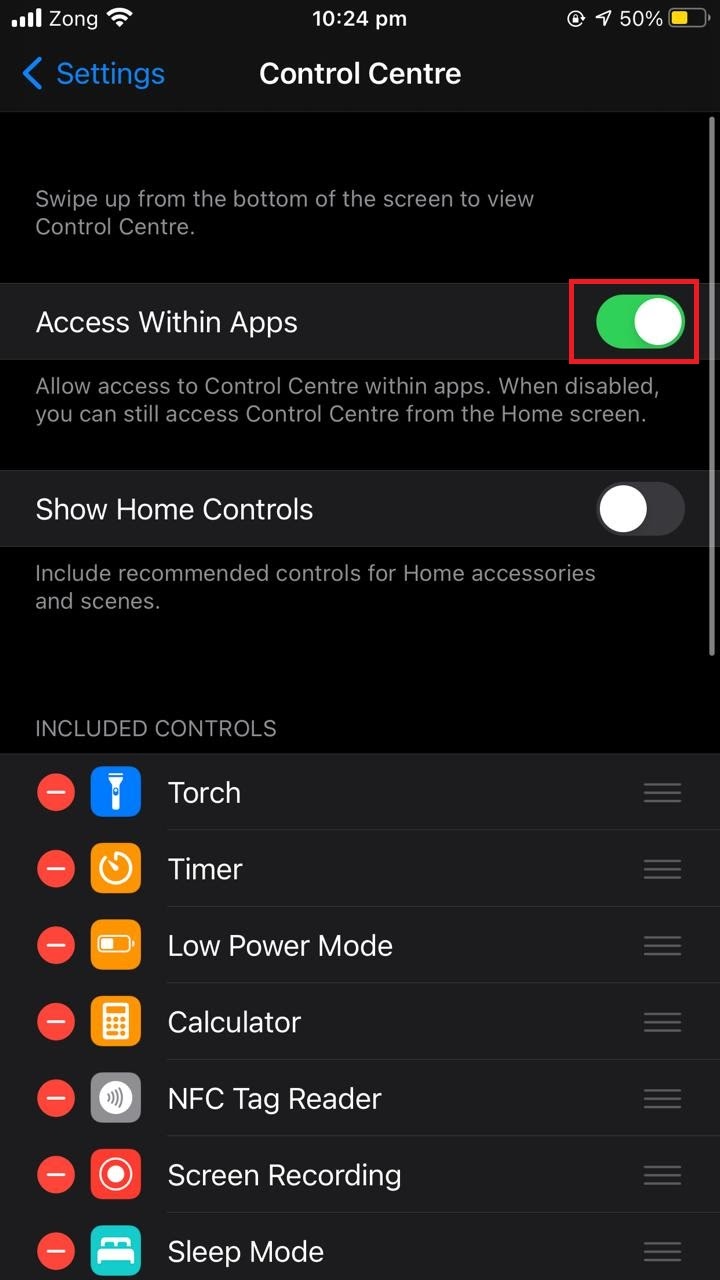
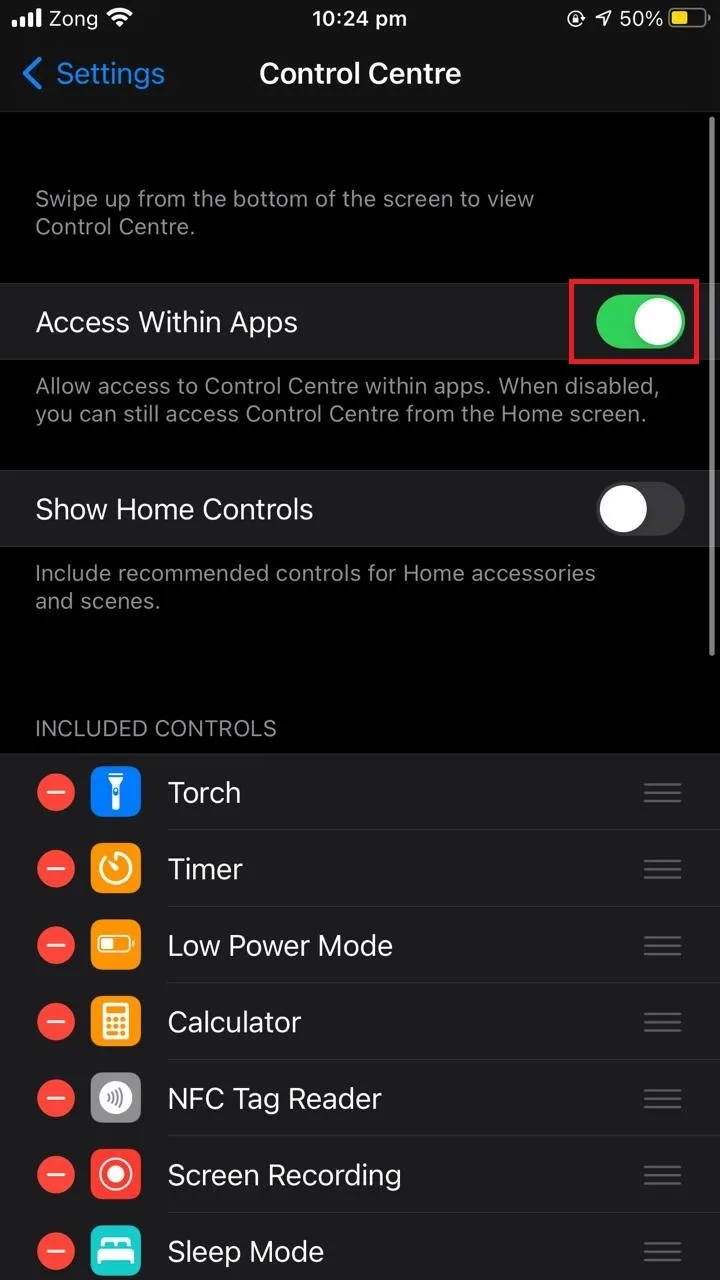
2. In apps
To turn off the Control Center swipe-up option within apps, go to Settings > “Control Center” and toggle off “Access within apps”.
Turning off swipe between apps
Swipe between apps is an iPad but is discontinued in iOS 14. If you are running iOS 13, you may have that feature, which lets you switch between apps by swiping the screen to the right.
You may find yourself accidentally switching between apps e.g. while playing a video game, where a lot of swiping is required, or while watching a video and trying to slide the video progress bar to the right.
This feature cannot be disabled in iOS 13 but you can disable it in iPad: simply go to Settings > Home screen & dock, and turn off multitasking
See also: iPhone Not Opening Apps From Links
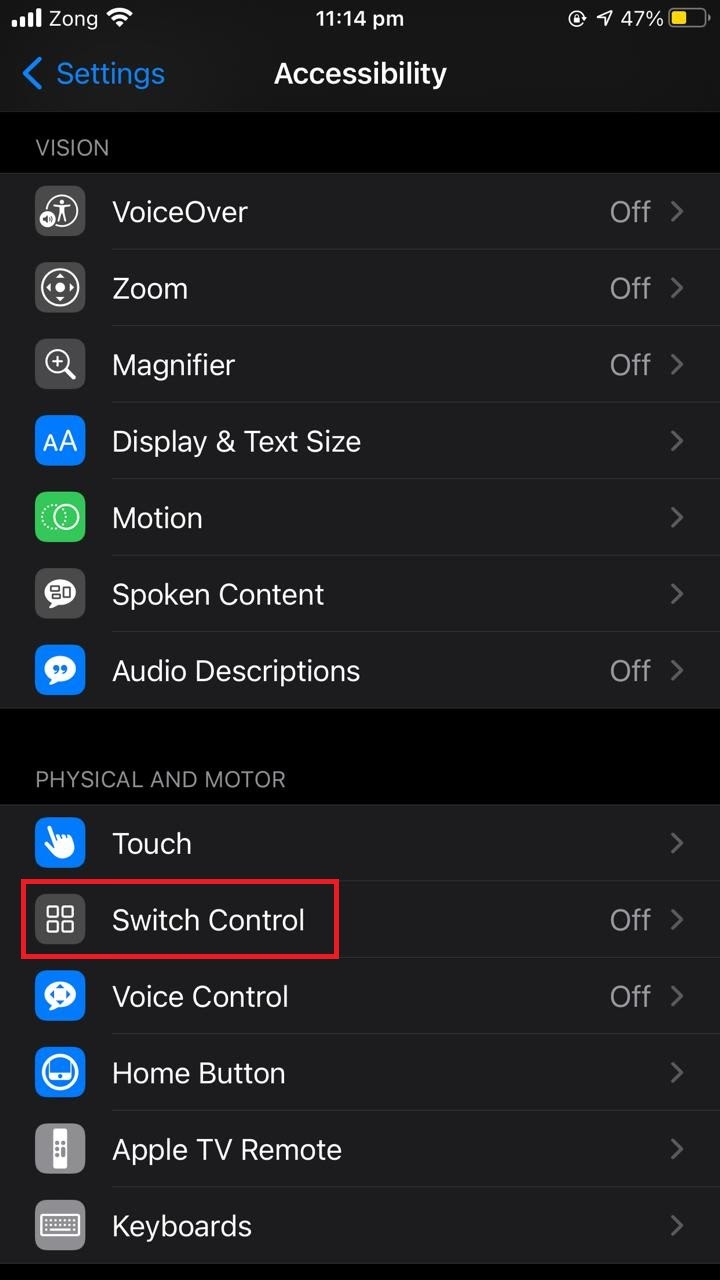
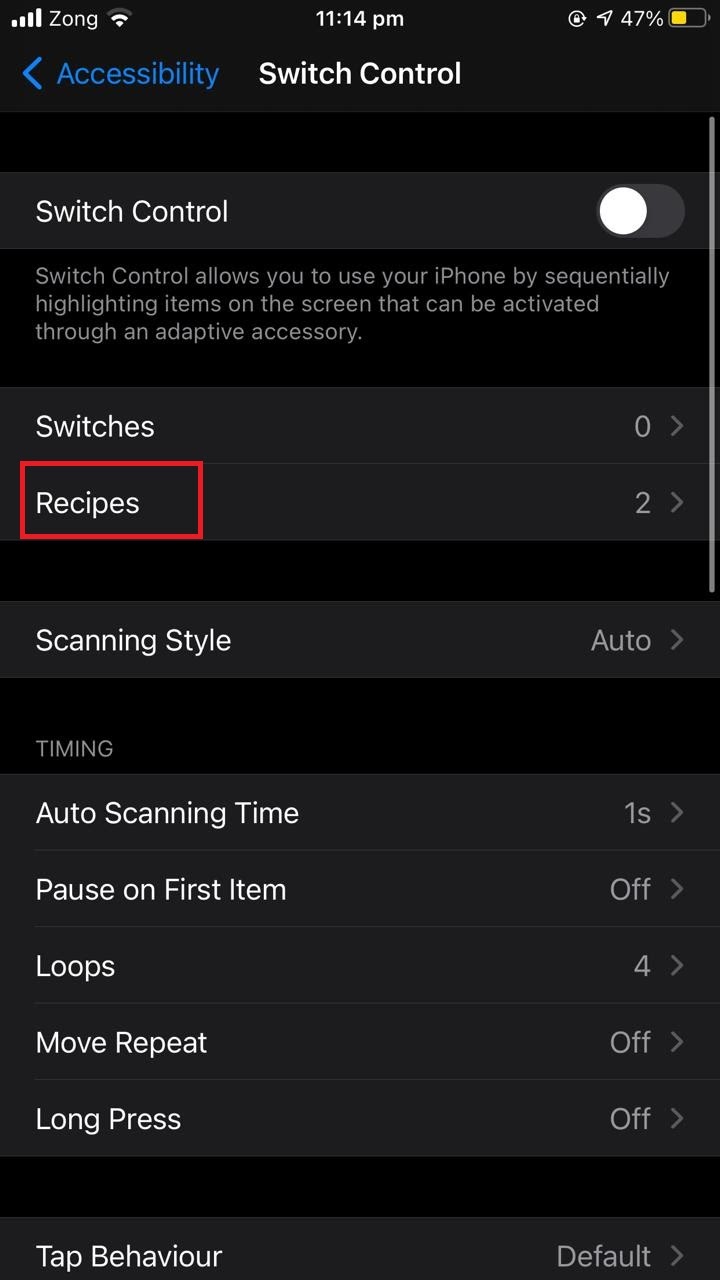
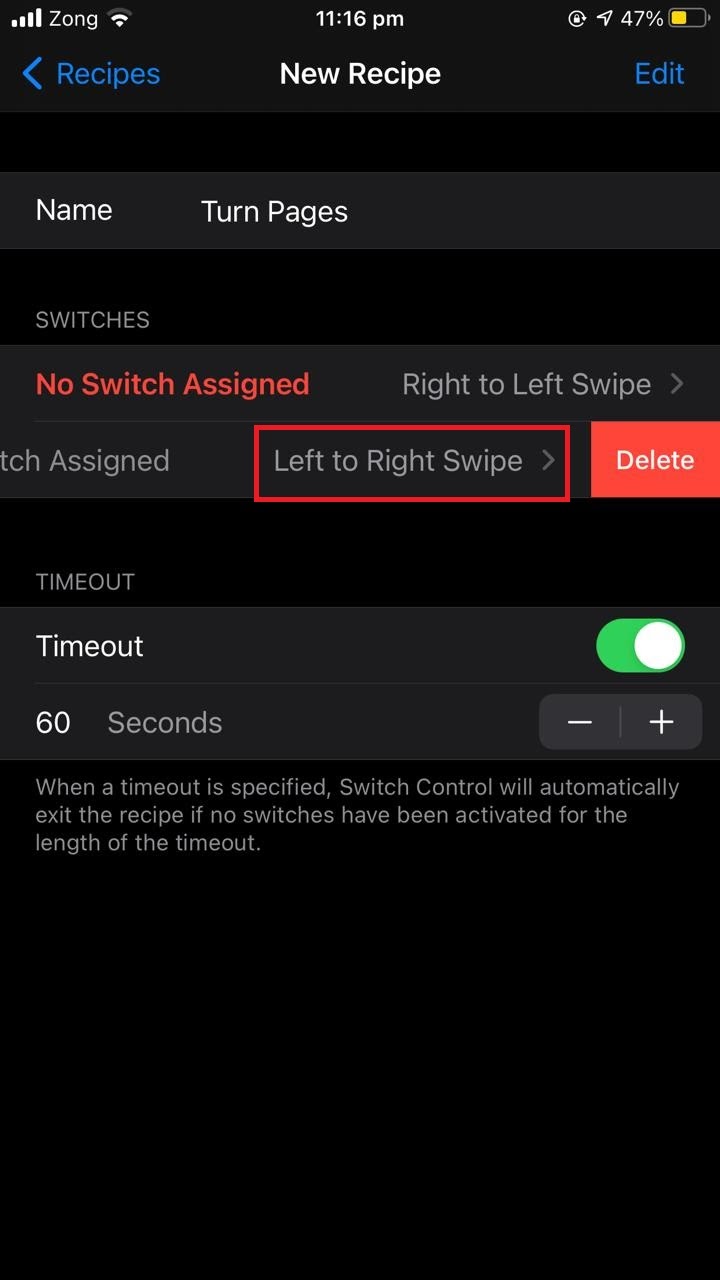
Turning off swipe to go back
Swiping left to right will trigger a shortcut to go back on the iPhone. On Safari and any other app, swiping left to right you will go back to the previous page. If you don’t like the “swipe to go back” feature on the iPhone, there’s a way to disable it:
Go to Settings > Accessibility > “Switch Control”> Recipes > “Turn Pages”. Find the “Left to right swipe” option and drag it towards the left to disable it.


Turn off Safari swipe
Safari has built-in swipe gestures allowing the user to swipe from left to right to go back to the previously opened webpage, and right to left to display the next web page that was viewed.
Up until iOS 7, there was no option to disable the swipe gestures in Safari. With newer iOS versions, however, you can now change the general swipe settings.
To change how the swipe gestures behave, see the section “Turning off swipe to go back” above.
Disabling iOS lock screen Swipe Left Camera
By default, swiping left while on the iPhone lock screen will open the camera app. You can disable access to the camera app from the lock screen on your iPhone: open Settings > “Screen Time”, choose “Content & Privacy Restrictions” > “Allowed Apps” and toggle off “Camera”.
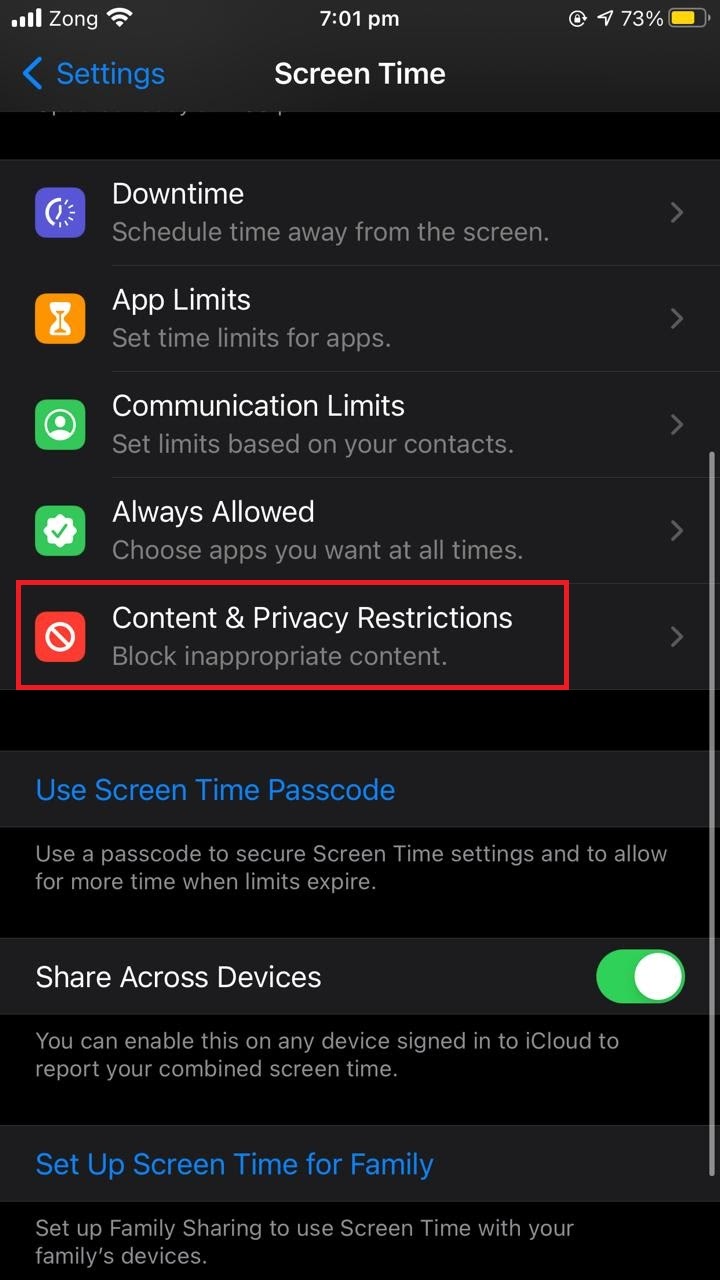

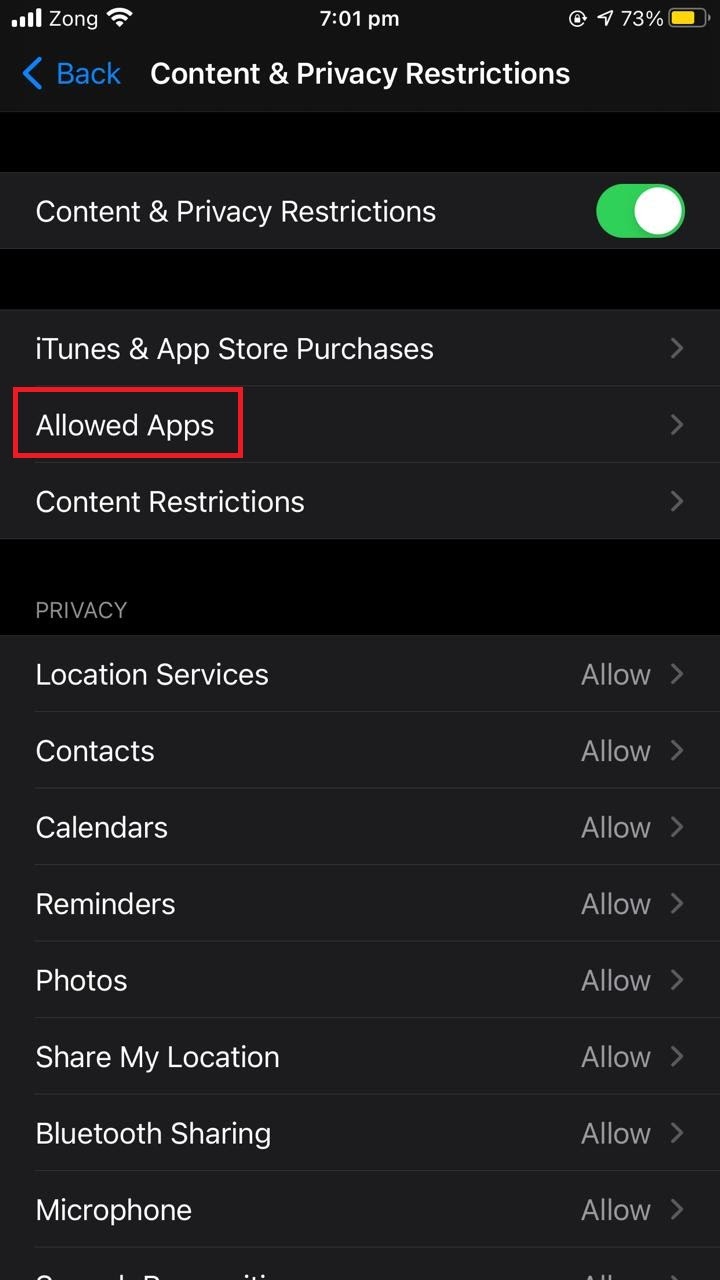

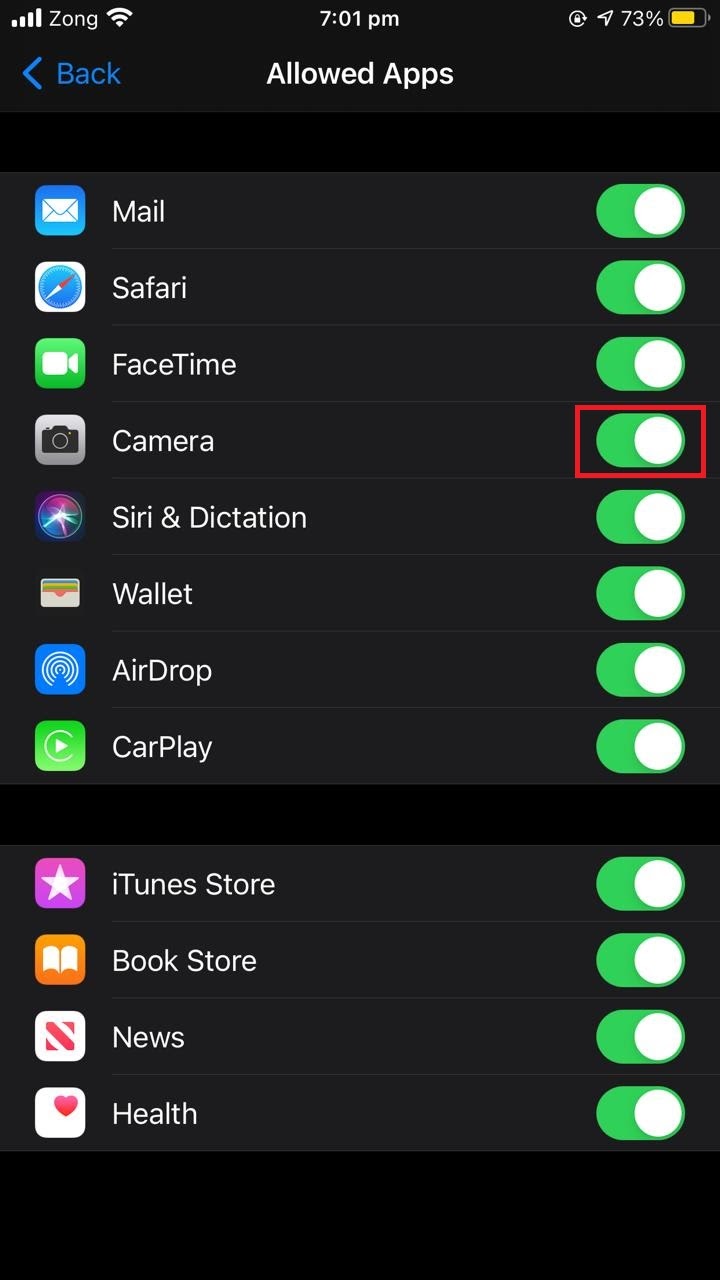

Your camera app will be disabled and swiping on the lock screen will no longer open the app.
However, after performing the above steps. your camera app will also disappear from the home screen and apps section, preventing you from accessing the camera.
When you need to use the camera, you’ll first need to go back and disable content and privacy restrictions to re-enable the camera app.
An alternative solution is to use a third-party camera app like Snapchat or Retrica. Using such an app, even if you’ve restricted direct access to the built-in iPhone camera app, you can use the camera through these apps.
Disabling Swipe to Unlock
Swipe to Unlock is irritating to some users as you need to unlock your phone by swiping up for each little access. Although there is no way to actually disable this setting on your iPhone, there is a cool workaround:
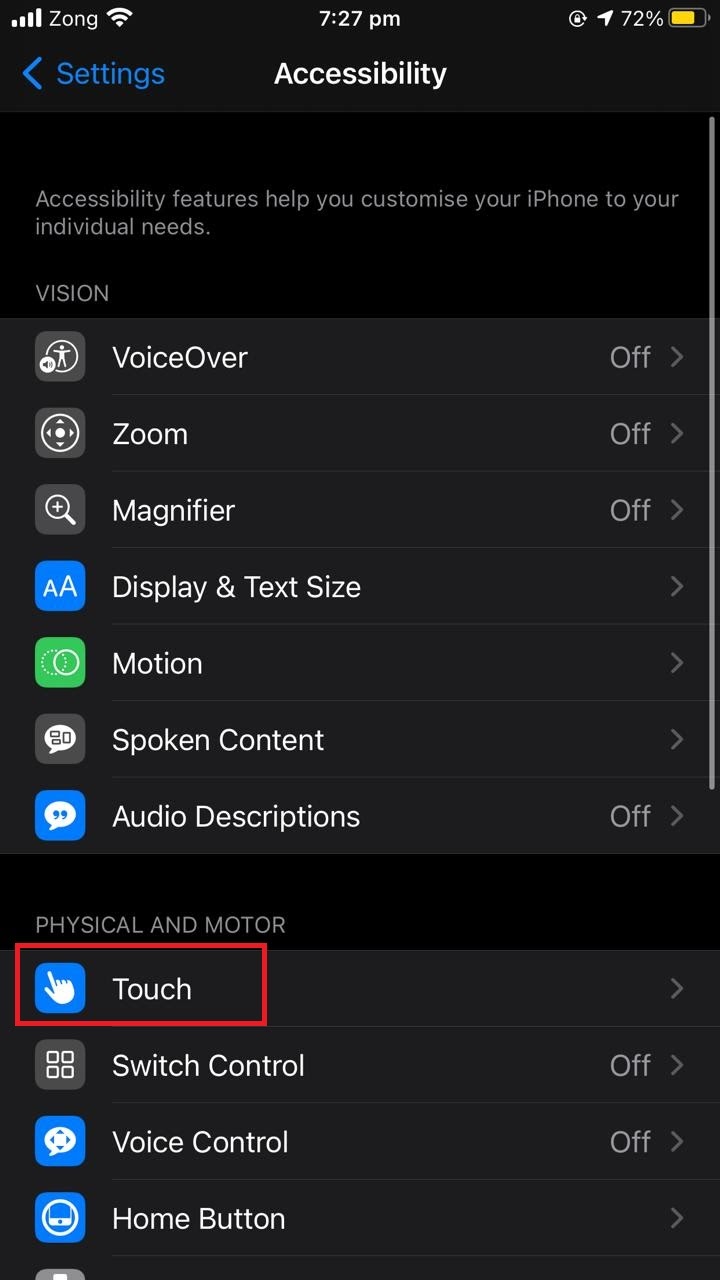
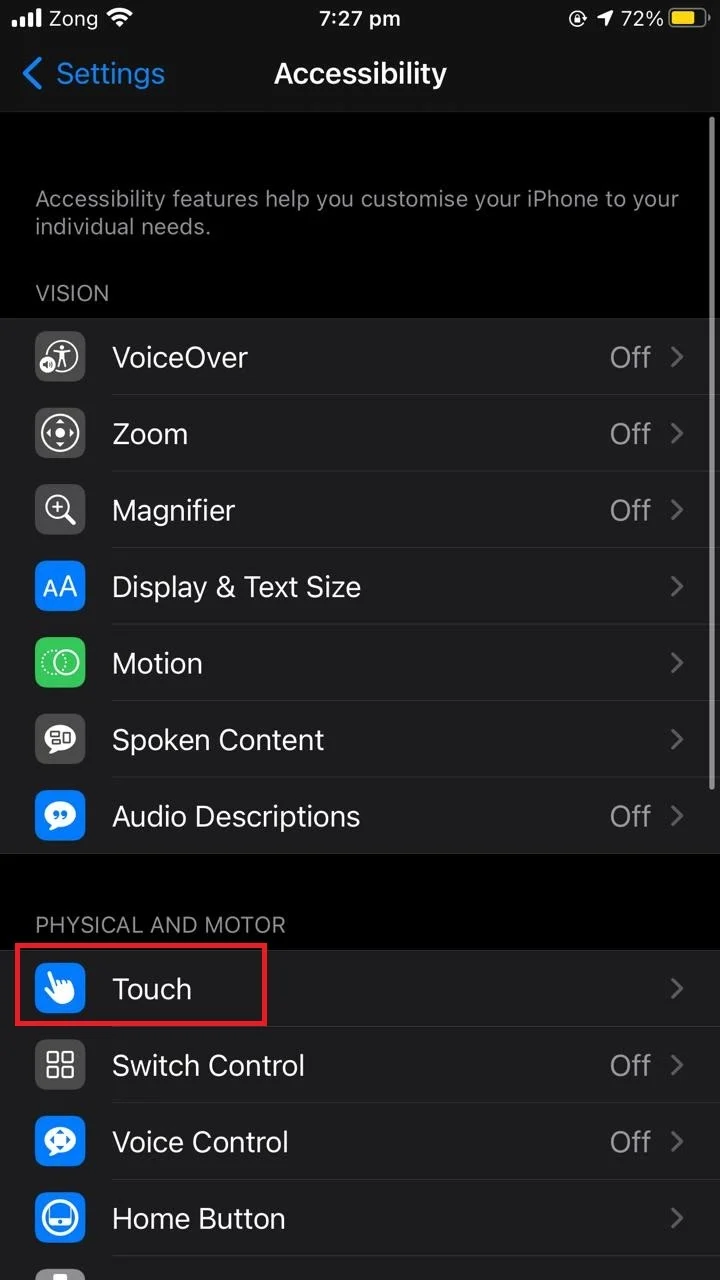
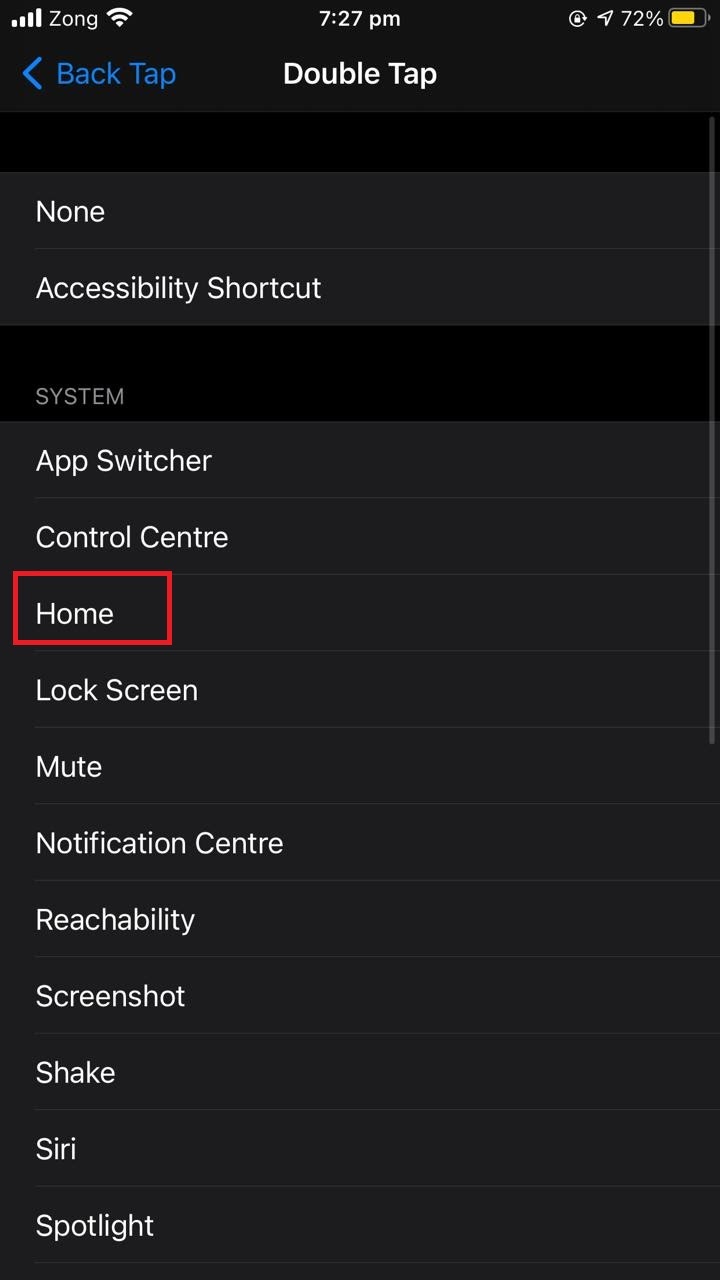
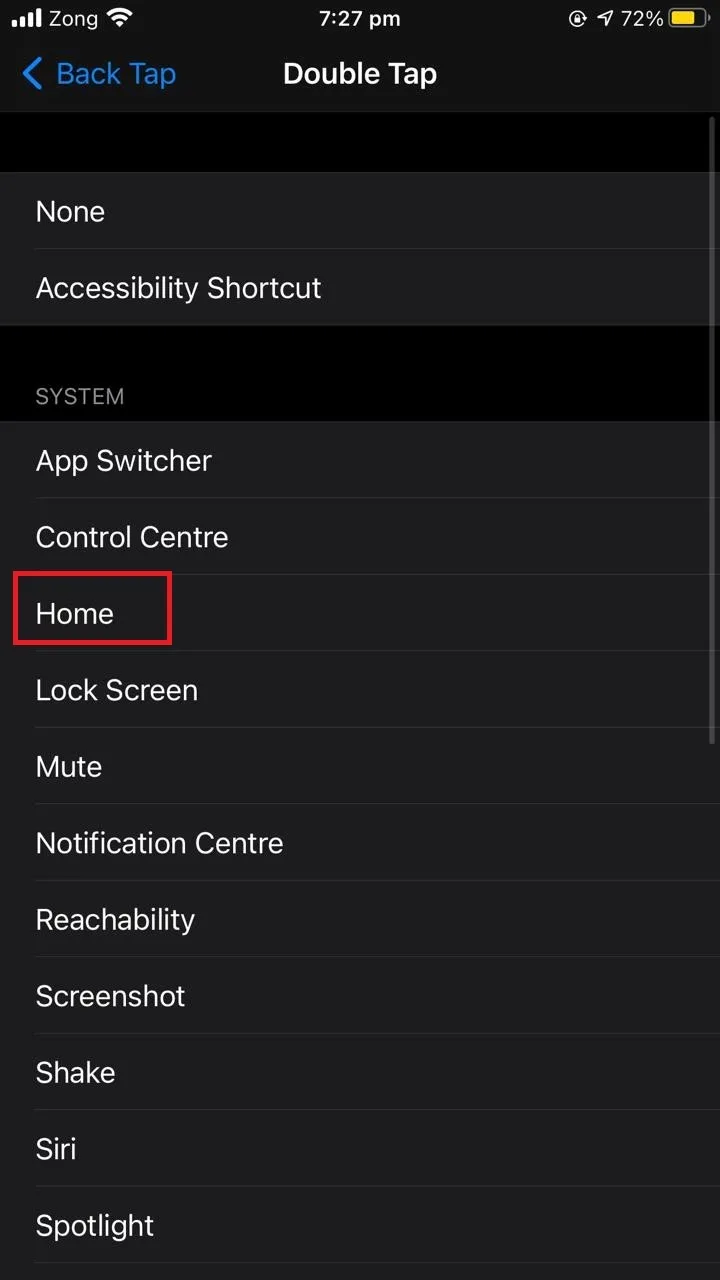
You can turn on the “Tap on back” setting to unlock your phone so you don’t have to swipe up every time. Go to Settings > Accessibility > Touch, scroll down and choose “Back Tap”. Set either “Double-Tap” or “Triple Tap” to ”Home”.
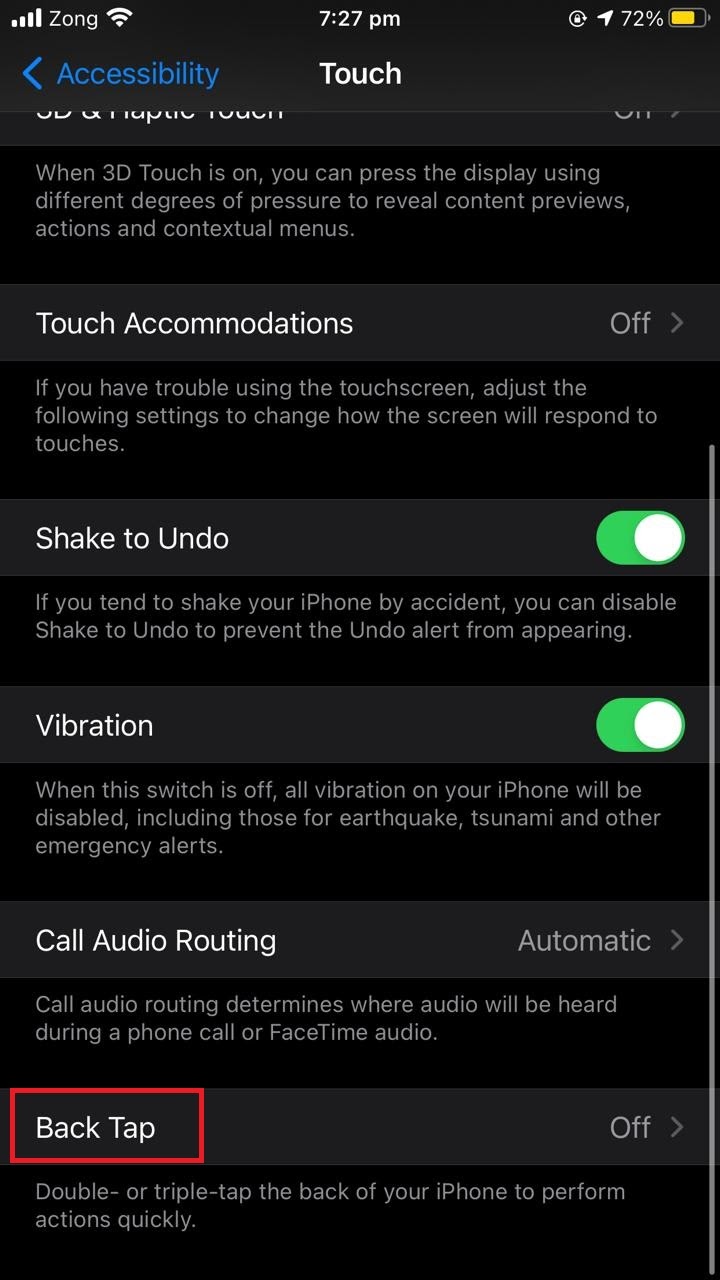
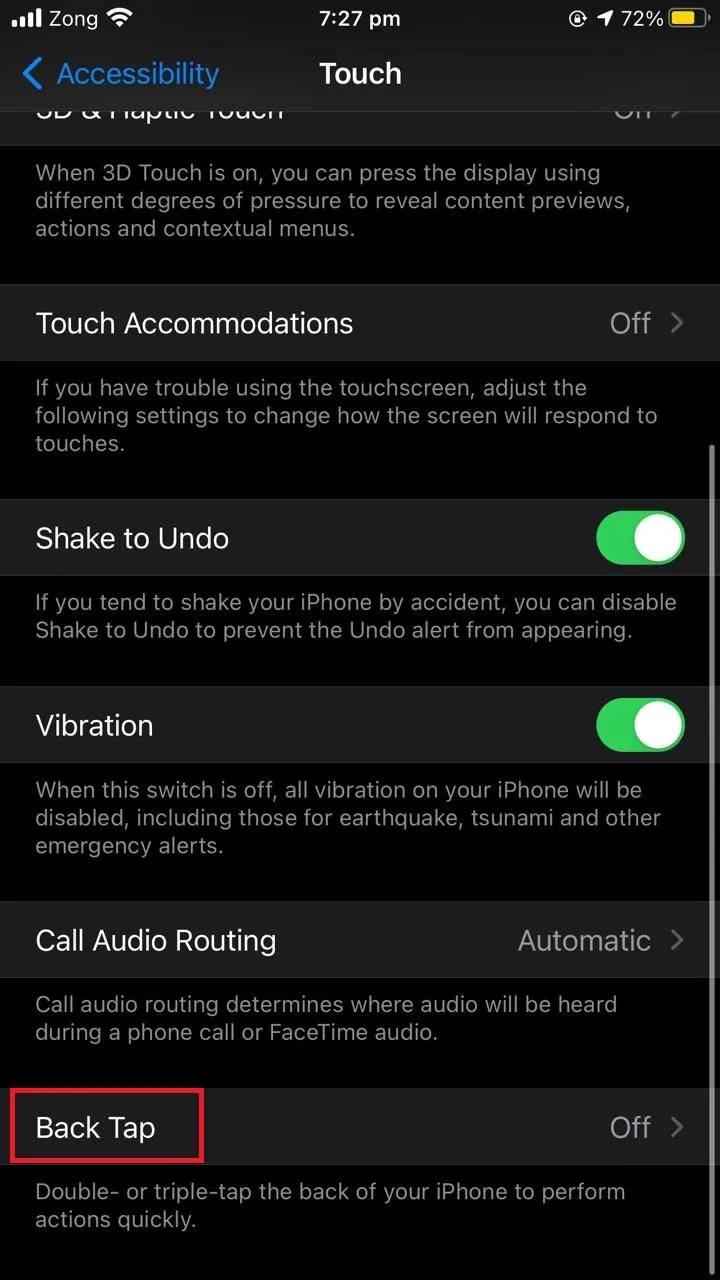


Assuming you don’t have a passcode set, you’ll now be able to unlock your iPhone by pressing the power button and double or triple-tapping on the back of your phone instead of swiping up.
See also: Why Is My iPhone Stuck On Lock Screen?
Disabling swipe down and up menus
When you swipe up on your iPhone you bring up the Control Center, while when you swipe down you get the Notification Center and Spotlight Search.
While there isn’t an option to disable the swipe gestures across the whole iPhone interface, you can disable the Control Center, Notification Center and Spotlight Search on the lock screen of your iPhone:
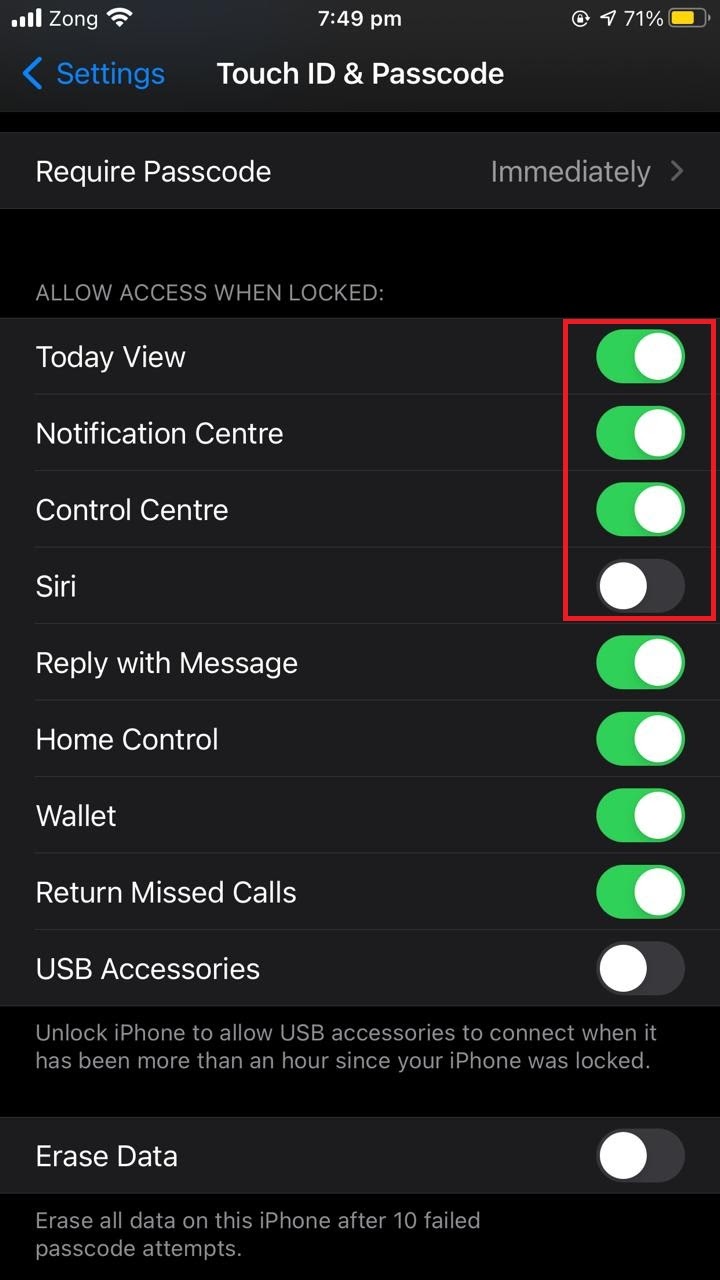
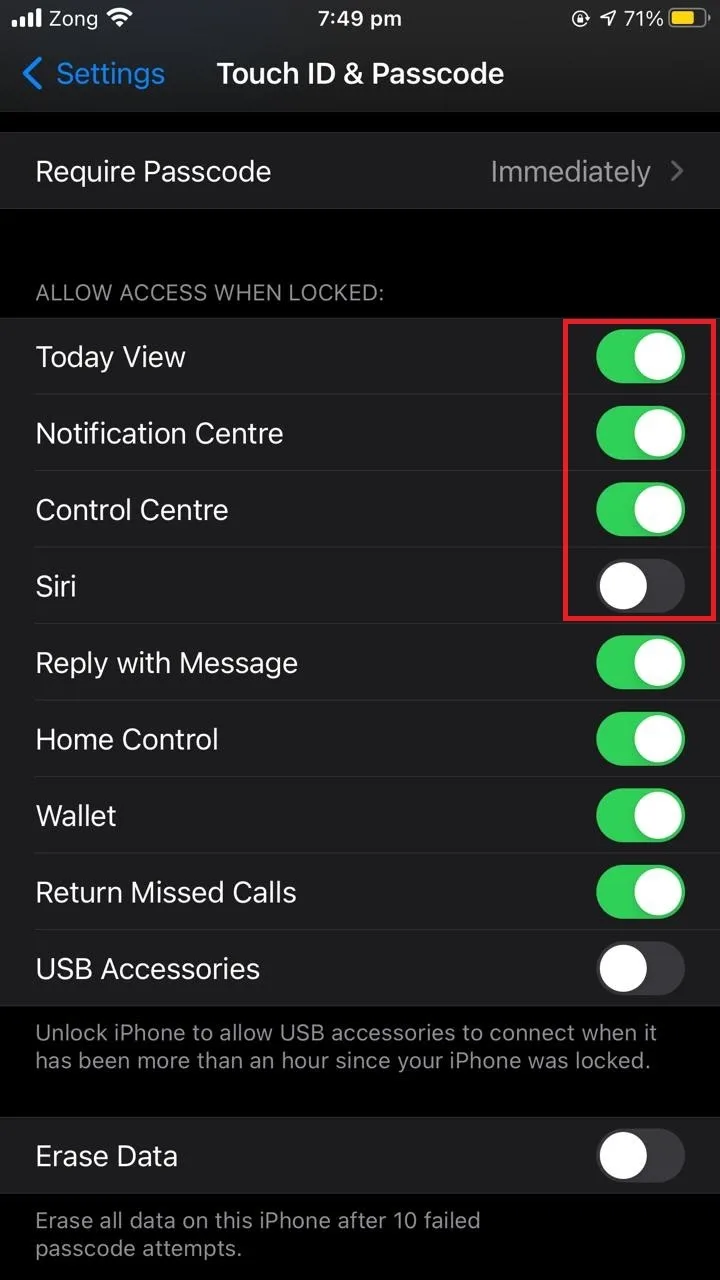
Go to Settings > “Touch ID & Passcode” (for 8 plus and previous phones) or “Face ID & Passcode” (for X and later phones). Enter your passcode, then scroll down to the section “Allow Access When Locked” and toggle off “Today View”, “Notification Center”, “Control Center” and “Siri”.
To turn off Spotlight Searches, go to “Siri & Search”, toggle off “Press Home for Siri”, “Allow Siri When Locked”. Toggle off all the suggestions.


Again, there is no setting to disable the Control Center (swipe-up option) and Notification Center (swipe-down option) on the home screen.
See also: How Do You Change Swipe Down On Android?
Turning off the Swipe keyboard feature
iPhone offers a cool “swipe typing” aka “slide to type” feature on the default iPhone keyboard. With this feature enabled, you can swipe across keyboard characters to write a word instead of tapping.
While this typing method avoids striking the screen repeatedly, you may not like this feature as it increases the chances of typing errors due to accidental sliding on your keyboard.
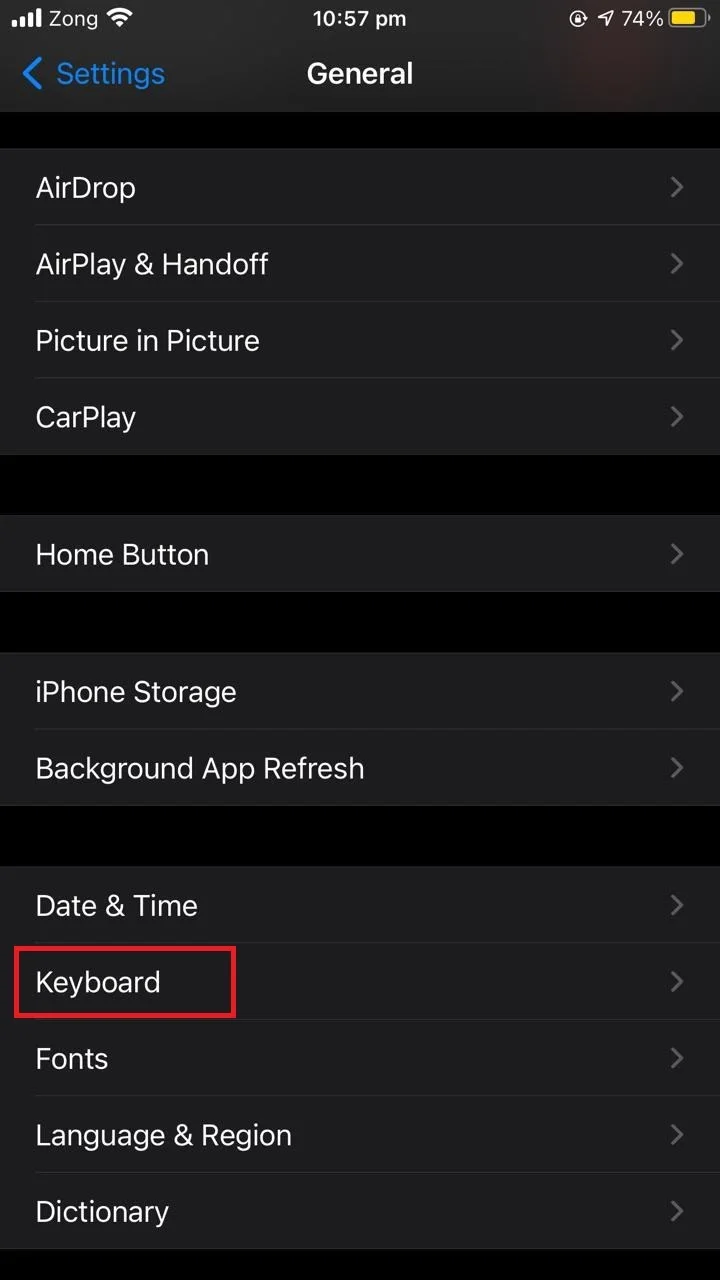
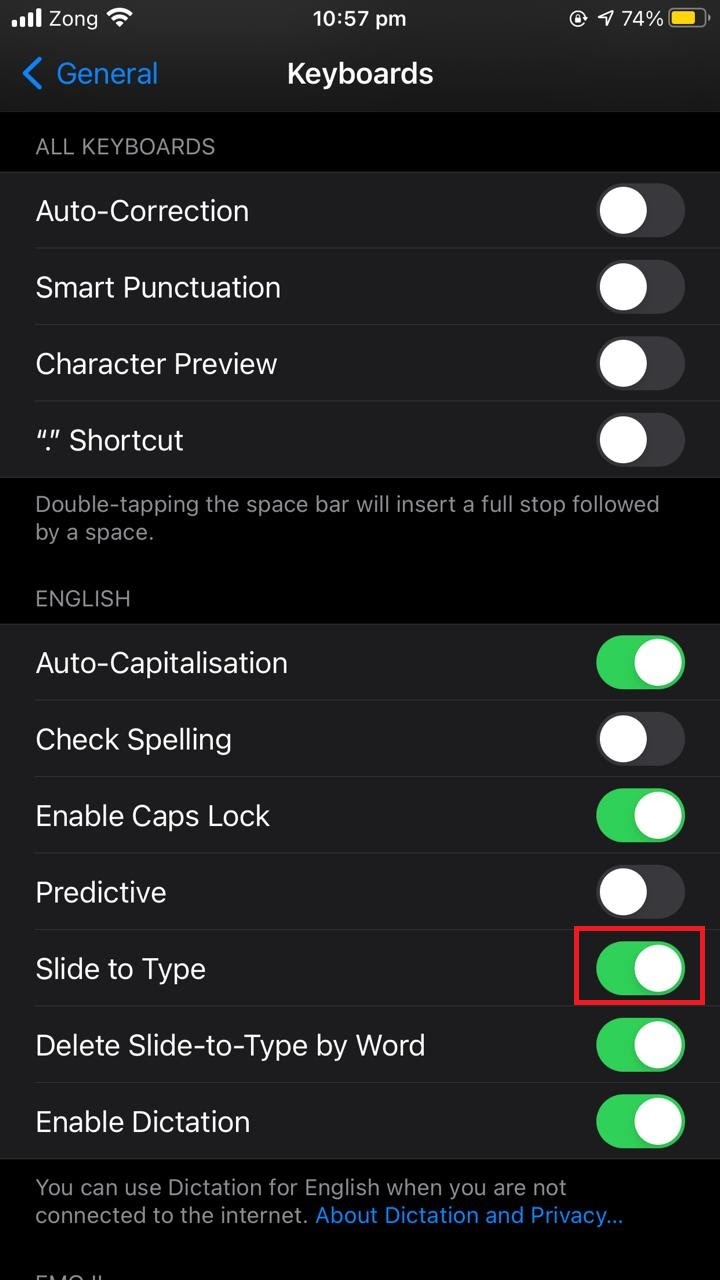
To turn off the swipe keyboard feature on your iPhone, go to Settings > General > Keyboard, scroll down and toggle off “Slide to Type”.


Turning off volume swiping
Volume swiping lets you adjust the volume through screen swipes.
While you can’t simply turn off the volume swiping option on your iPhone, you can turn on “Guided Access” and restrict volume modifications (see below). Another option is to restrict the usage of volume buttons to modify ringer sound and alerts.
1. Restrict volume using guided access
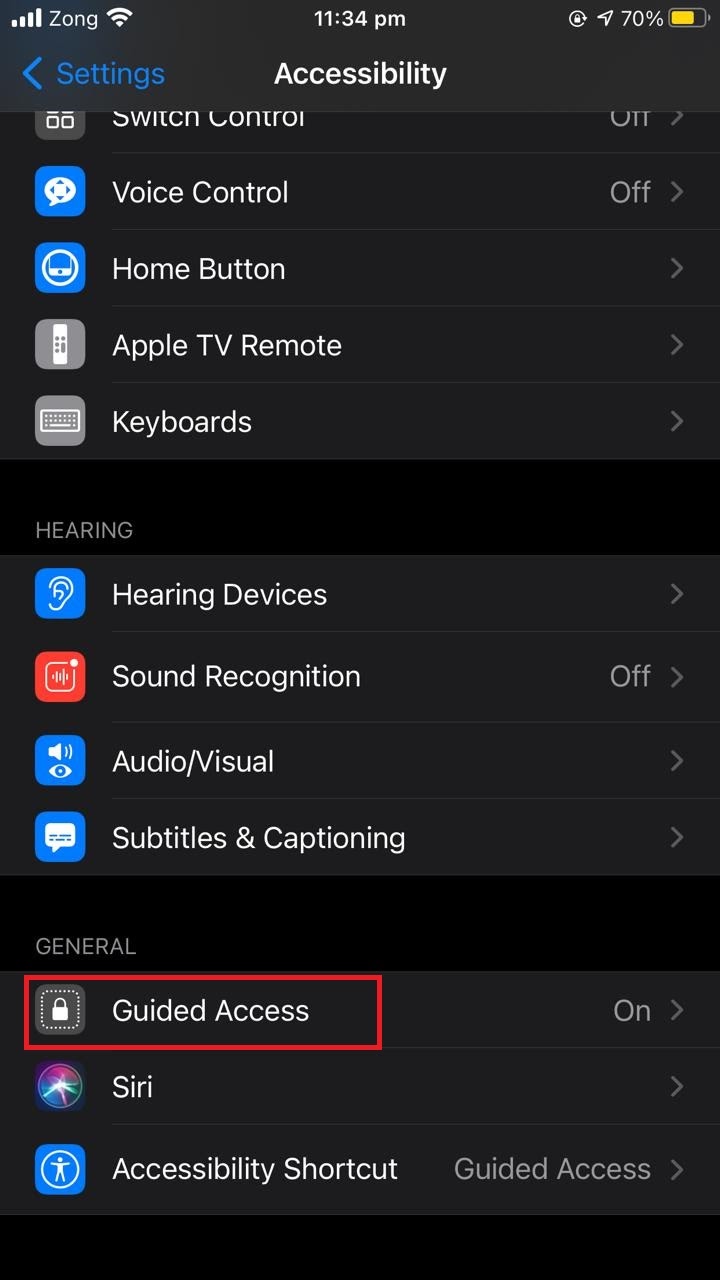
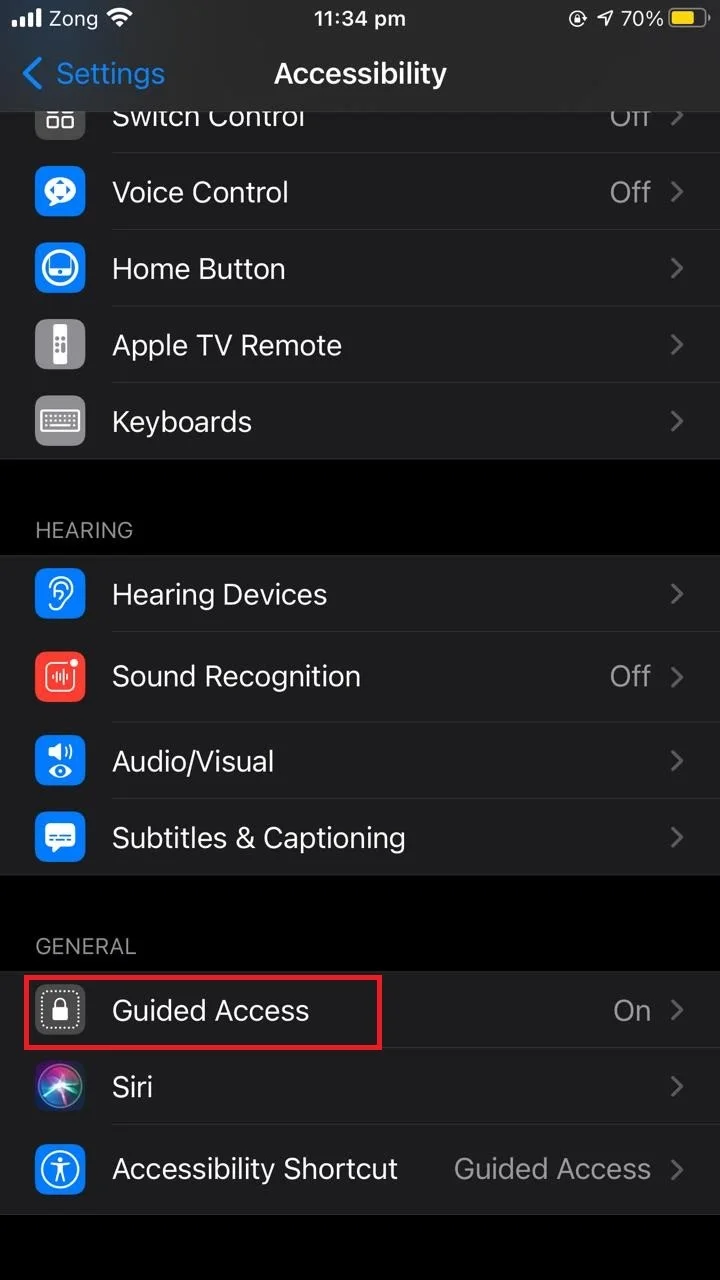
Guided Access restricts the usage of your phone so it only runs the current app. All the buttons and settings will be disabled unless guided access is disabled. To turn on Guided Access on iPhone, go to Settings > Accessibility, scroll down to the “General” section, select “Guided Access” and toggle on “Guided Access”.
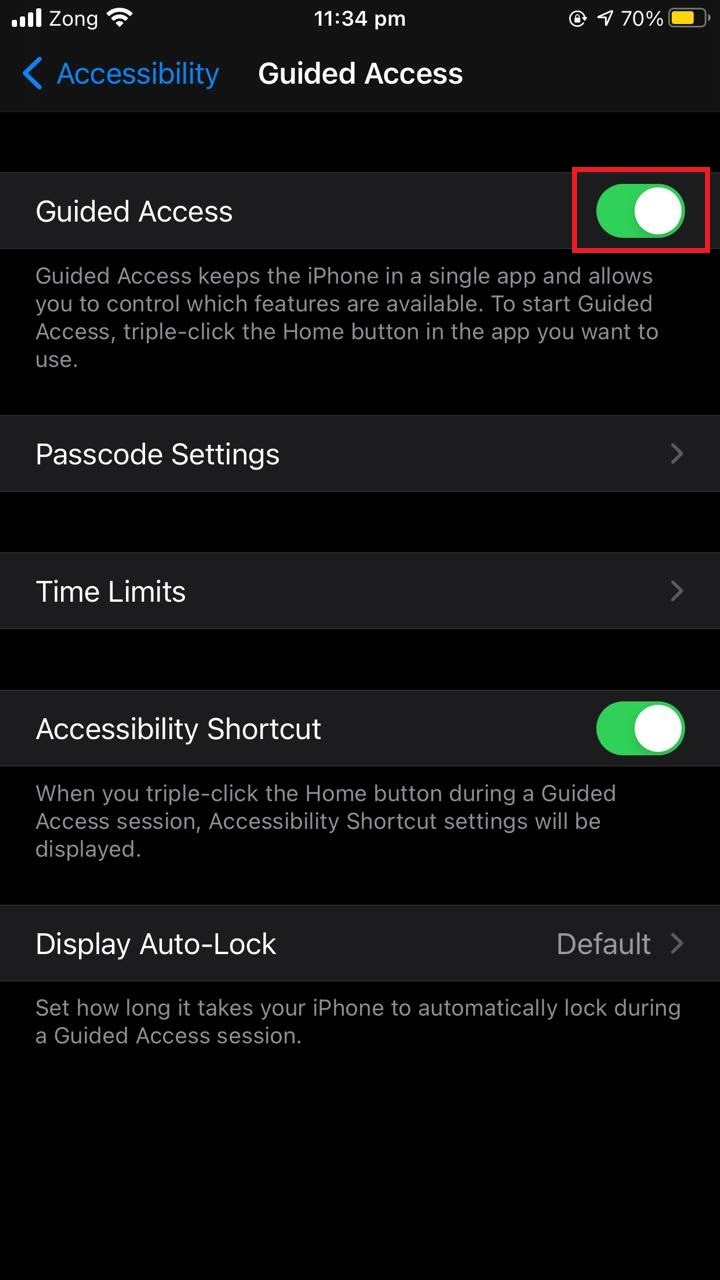
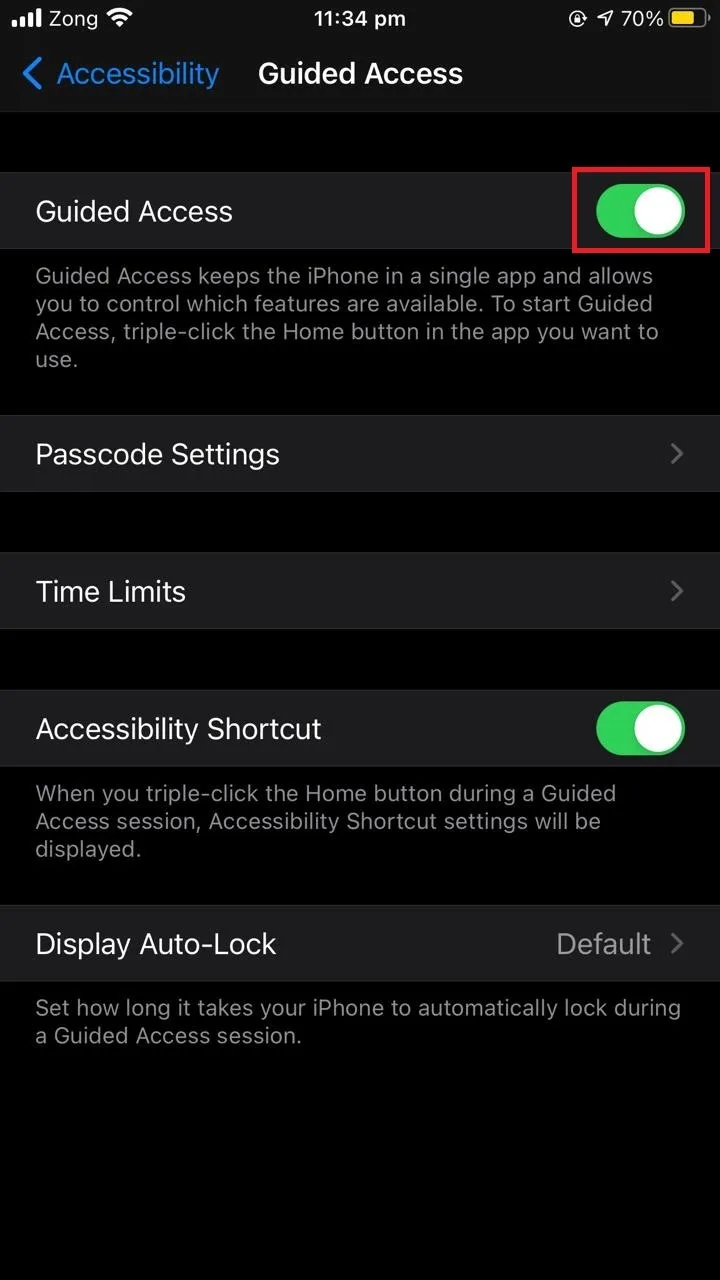
After enabling Guided Access, you can turn it on as follows:
- On iPhone 8 and 8 plus, triple-press the home button
- On later versions, triple-press the side button.
After enabling Guided Access, triple-press the home button or side button to edit the settings. You can then turn off the volume changing buttons to restrict its usage during guided access.
2. Restrict ringer and alerts volume
Another thing you can do is to restrict modification of the ringer and notifications volume by disabling the volume buttons for these two settings. Go to Settings > “Sound & Haptics” and toggle off “Change with Buttons”.

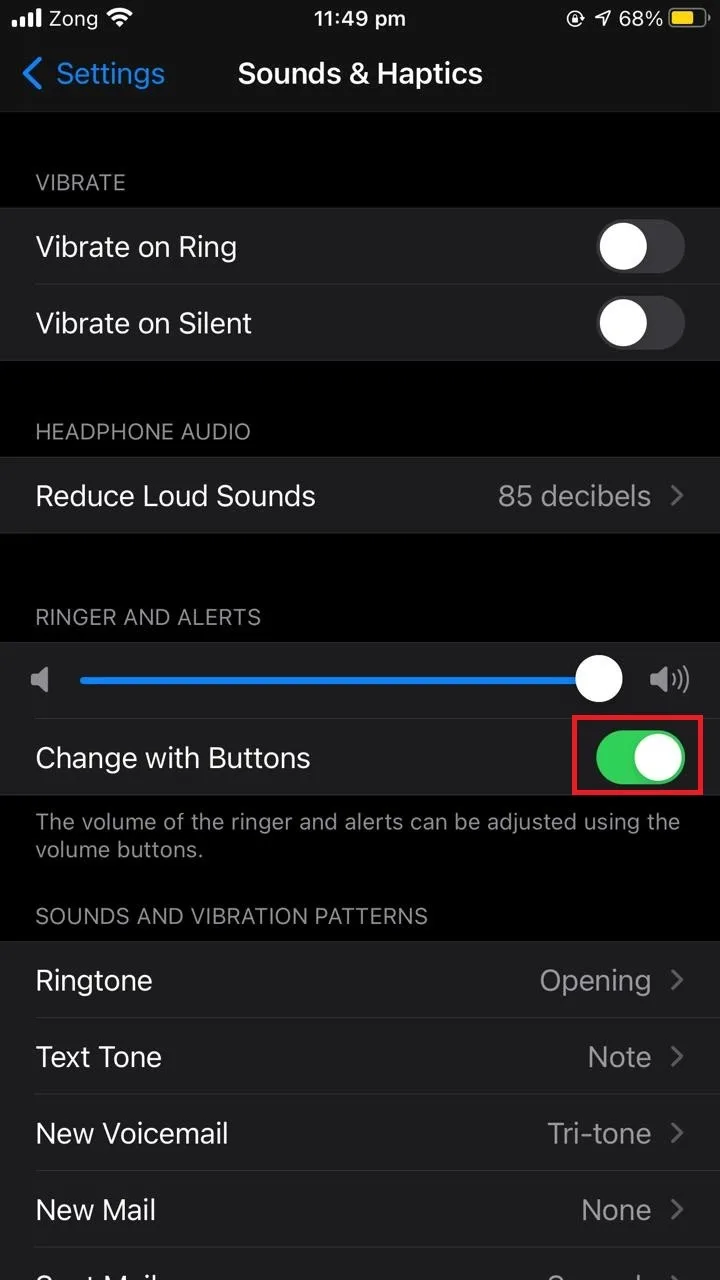
Now even when you press the volume buttons, the volume for ringer and alerts will not be modified.
See also: How Can I Answer My iPhone Without Swiping?
Removing swipe-up after FaceID unlock
When you press the wake button on your iPhone and enter your FaceID, even after successful face identification the phone will ask you to swipe up to use the phone.
This adds an additional layer to avoid accidental unlocking, but it can be annoying. To easily remove this swipe-up feature, see the section “Disabling Swipe to Unlock” earlier.
Turning off multi-finger swipe gestures on iPhone
Multi-finger swipe gestures are available in iOS for the iPad but not the iPhone. These gestures can disturb users while playing games: since games involve a lot of tapping and swiping, iOS keeps detecting multi-finger gestures and reacts to them, which is annoying for the player.
To solve this issue, turn off multi-finger swipe gestures on your iPad. Go to “Settings” > “Home screen & Dock”. Choose “Multitasking” and toggle off “Gestures”.
This will limit gestures to single and dual-finger touch operations only, disabling multi-finger touch.
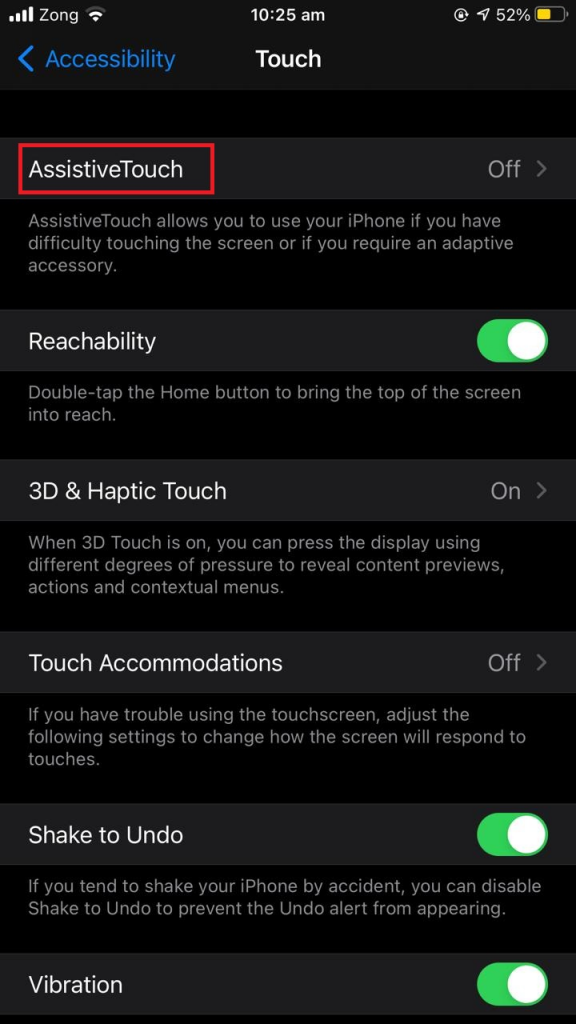
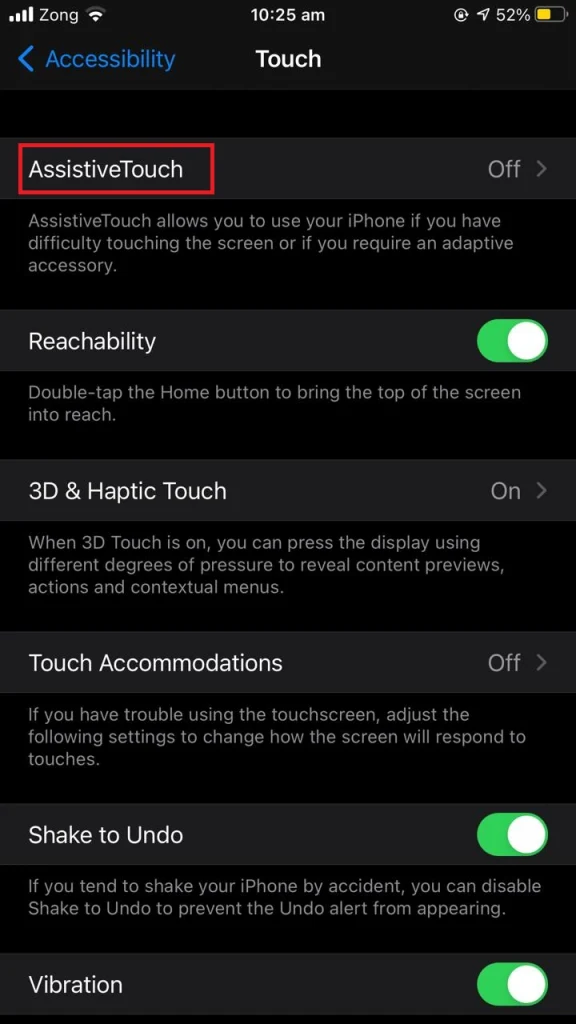
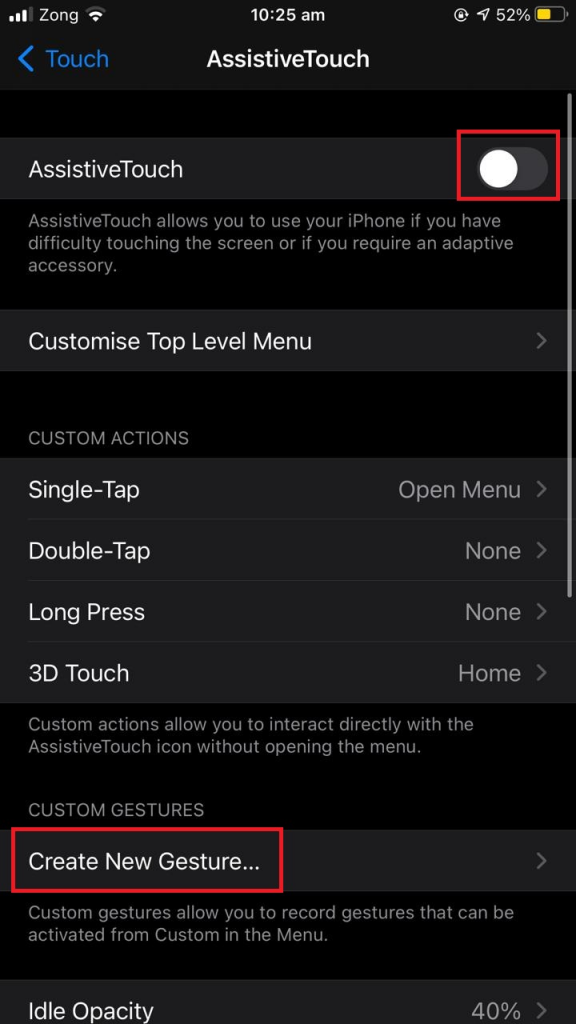
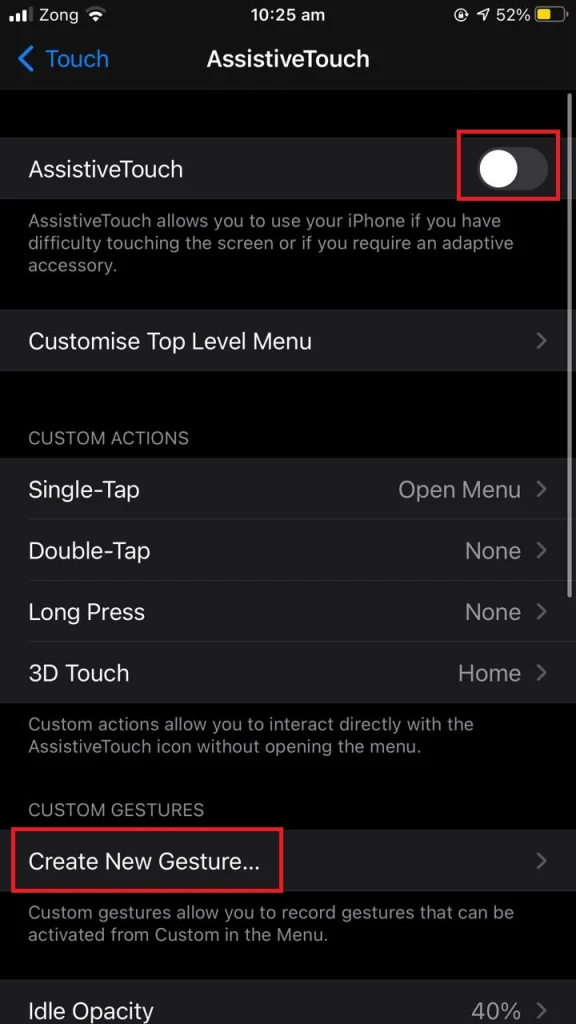
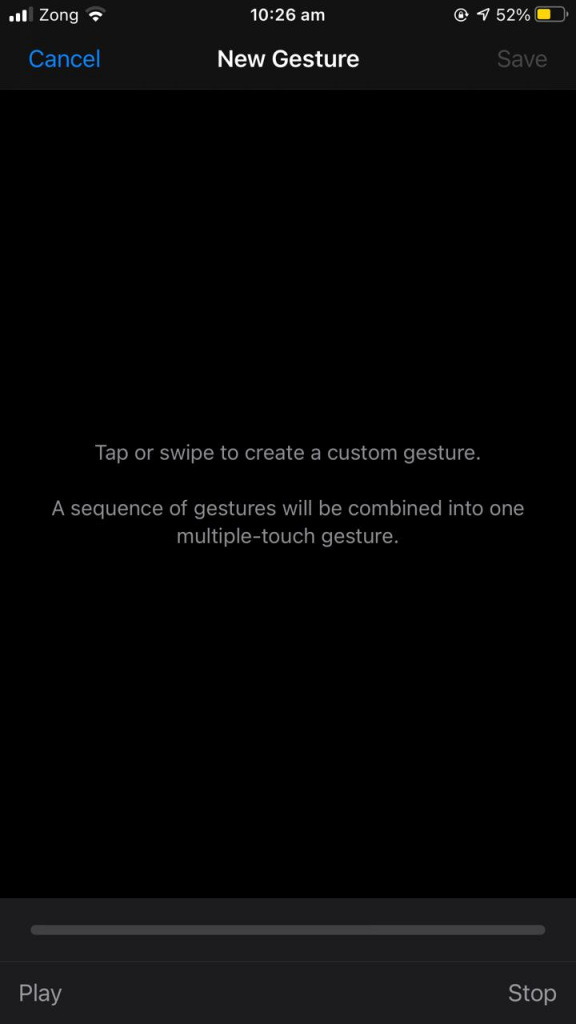
Creating custom gestures on iPhone
Using the “Accessibility” feature of the iPhone, you can add your favorite gestures as shortcuts. For example, you can customize Touch and Hold to perform some action on your phone, or you can initiate a gesture based on a certain degree of rotation.
To create your custom gestures on iPhone, go to Setting > Accessibility > “Assistive Touch” and toggle on “Assistive Touch”. Next, scroll down and choose “Custom New Gestures”. Follow the instructions to create your new customized gestures for iPhone.
Disabling iPad gestures
iPad gestures can cause trouble while playing games that involve a lot of swiping and screen touching. To get rid of this issue, you can disable gestures on your iPad. To limit your iPad to one or two finger gestures, you can disable iPad gestures available under settings.
Open Settings > “Home screen & Dock” > Multitasking, and toggle off “Gestures”.