You’re unable to find a contact in your iPhone contact list. After a bit of research, you realize the contact you’re looking for has been merged under another contact without you doing anything. Sounds familiar?
iPhone will sometimes merge two or more contacts that have the same first and last names or some other common information like email address, phone number, etc. in a single contact. This behavior can be very annoying and make you waste a lot of time scrolling through your contacts.
Let’s see why this happens and how to fix it.
- iPhone is combining my contacts
- Contacts were accidentally merged!
- iMessage is combining two contacts into one thread
- iMessage threads and Family Sharing
- What happens if I turn off iCloud contacts ?
- Duplicate contacts on iPhone
iPhone is combining my contacts
If you import contacts from various sources such as WhatsApp, Facebook, etc, this can result in multiple entries for a single person in your Contacts list.
To avoid this issue, the iPhone combines contacts with the same names and other information from different sources as a single unified contact.
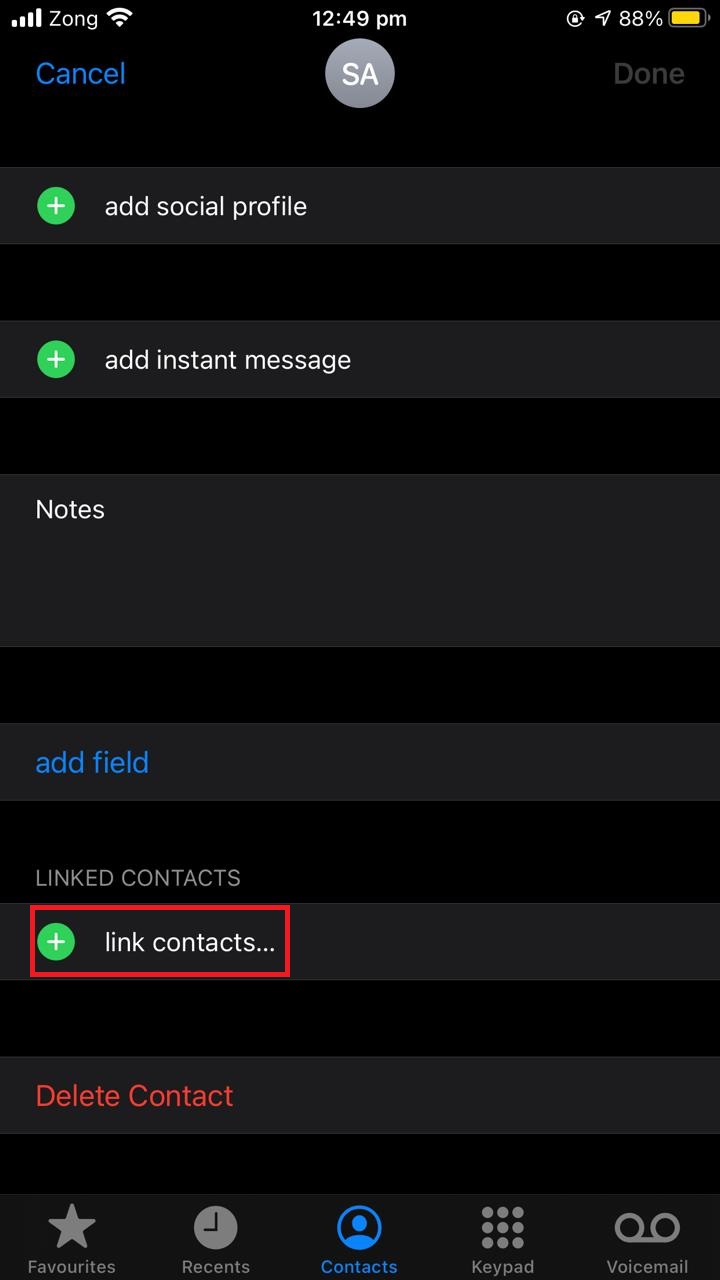
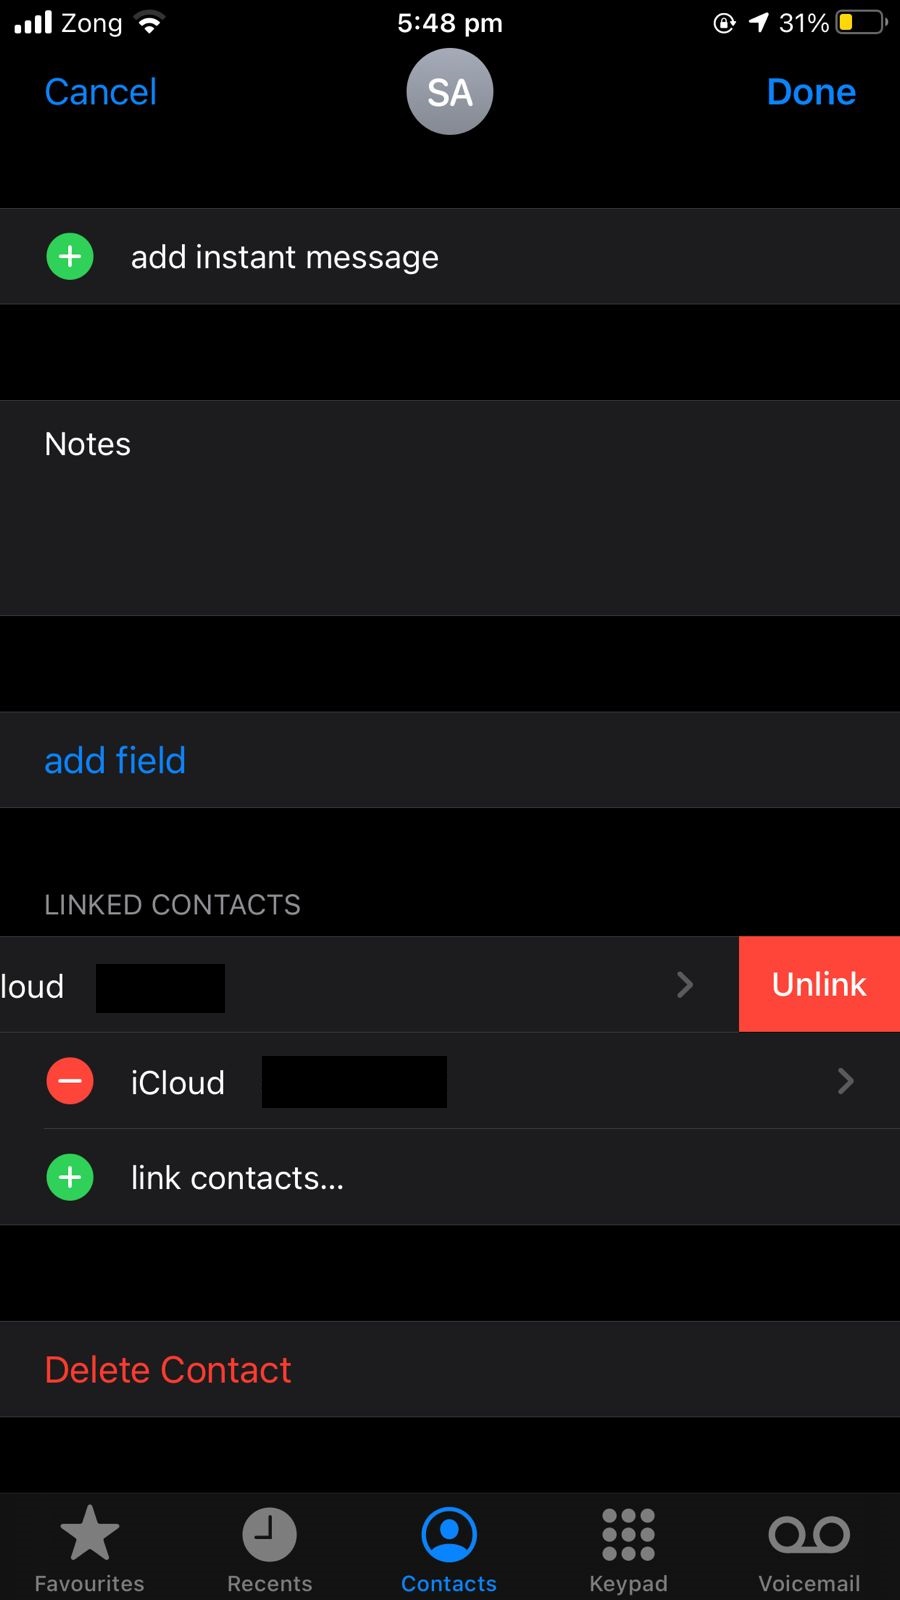
If you think that the iPhone has mistakenly combined some contacts or you don’t want certain contacts linked together, you can unlink the contacts manually.
To unlink contacts on your iPhone, open the Phone and move to the “Contacts” tab. Choose the contact that you want to unlink.
Tap on “Edit” at the top right corner and scroll down to the “Link” section. Swipe left on the contact that you want to unlink and choose “Unlink”. Finally, tap “Done”.

Contacts were accidentally merged!
If you are sharing your Apple ID with someone and iCloud is enabled for Contacts, your contacts will likely get merged with the other person’s. In order to avoid this mess, you need to use a separate Apple ID and avoid sharing it with anyone.
If your contacts already got merged with someone else’s, you need to manually delete these contacts. To do this, disable iCloud for Contacts and manually delete the unwanted contacts via icloud.com.
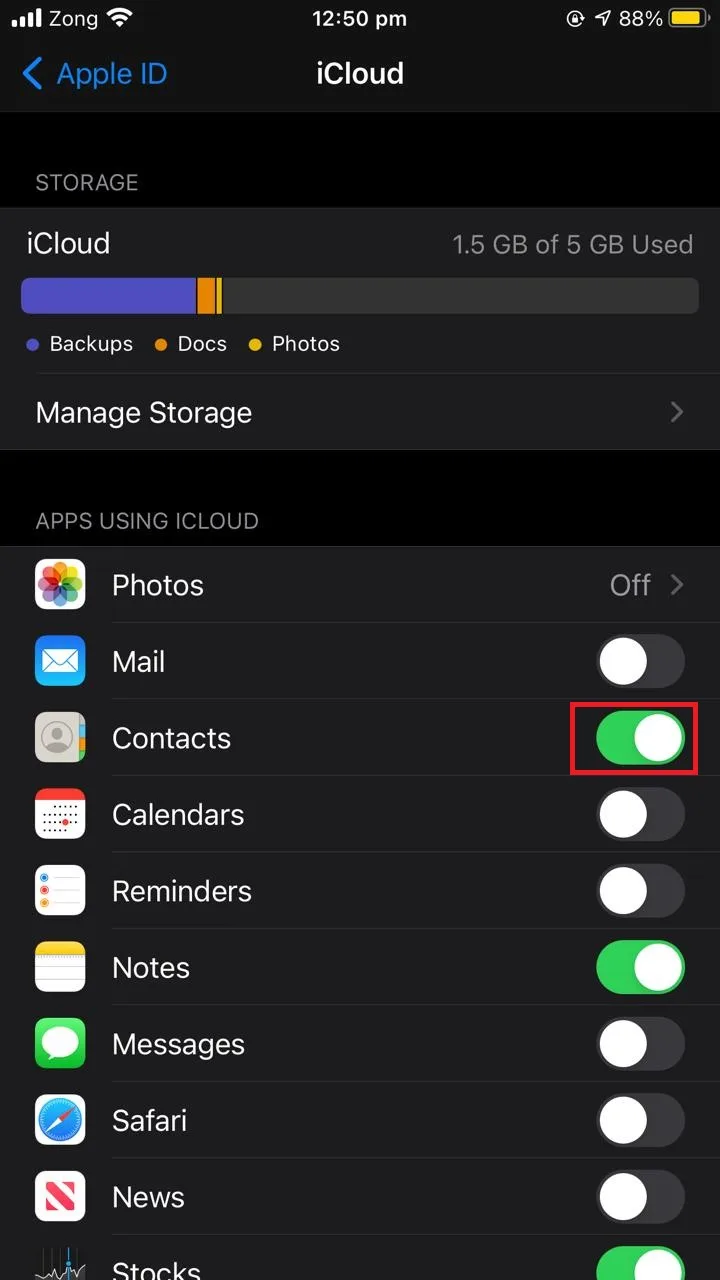
Go to Settings > [Your Account] > iCloud. Toggle off Contacts. Choose to keep the data on your phone when asked. After that, scroll down and delete your account.

Set up your phone with a new Apple ID that you haven’t shared with anyone else, then turn the iCloud for Contacts on again.
After that, visit icloud.com and sign in with your Apple ID. Simply delete the contacts you don’t want.
Besides your contacts themselves sometimes getting merged on the iPhone, another related issue is seeing your iMessage conversations with several contacts getting combined together.
iMessage is combining two contacts into one thread
By default, iMessage uses the Apple ID instead of a phone number for identifying a contact. As a result, it will combine the threads for contacts that share the same Apple ID together, as these are considered the same contact.
Since the iOS 12 update, Apple streamlined iMessage conversations by merging all conversations from linked addresses into a single thread.
When you send or receive iMessages to or from a single Apple ID, they appear in one thread. This is because the iPhone considers contacts using the same Apple ID as a single person using different iOS devices.
So if you share your Apple ID with family members or friends, iMessages sent and received from by these people will be shared across all the devices that use that Apple ID.
The conversation threads from the same Apple ID will also be unified into a single conversation.
Here are a few things you can try In order to avoid the problems created by combining iMessage threads:
Workaround #1: set up a Family Sharing Account
If you don’t want your iMessage threads combined but still want to share access to purchased apps and services, you can set up a family sharing account.
With a family sharing account, each member of your group sets up their own Apple ID and then shares access to Apple purchases.
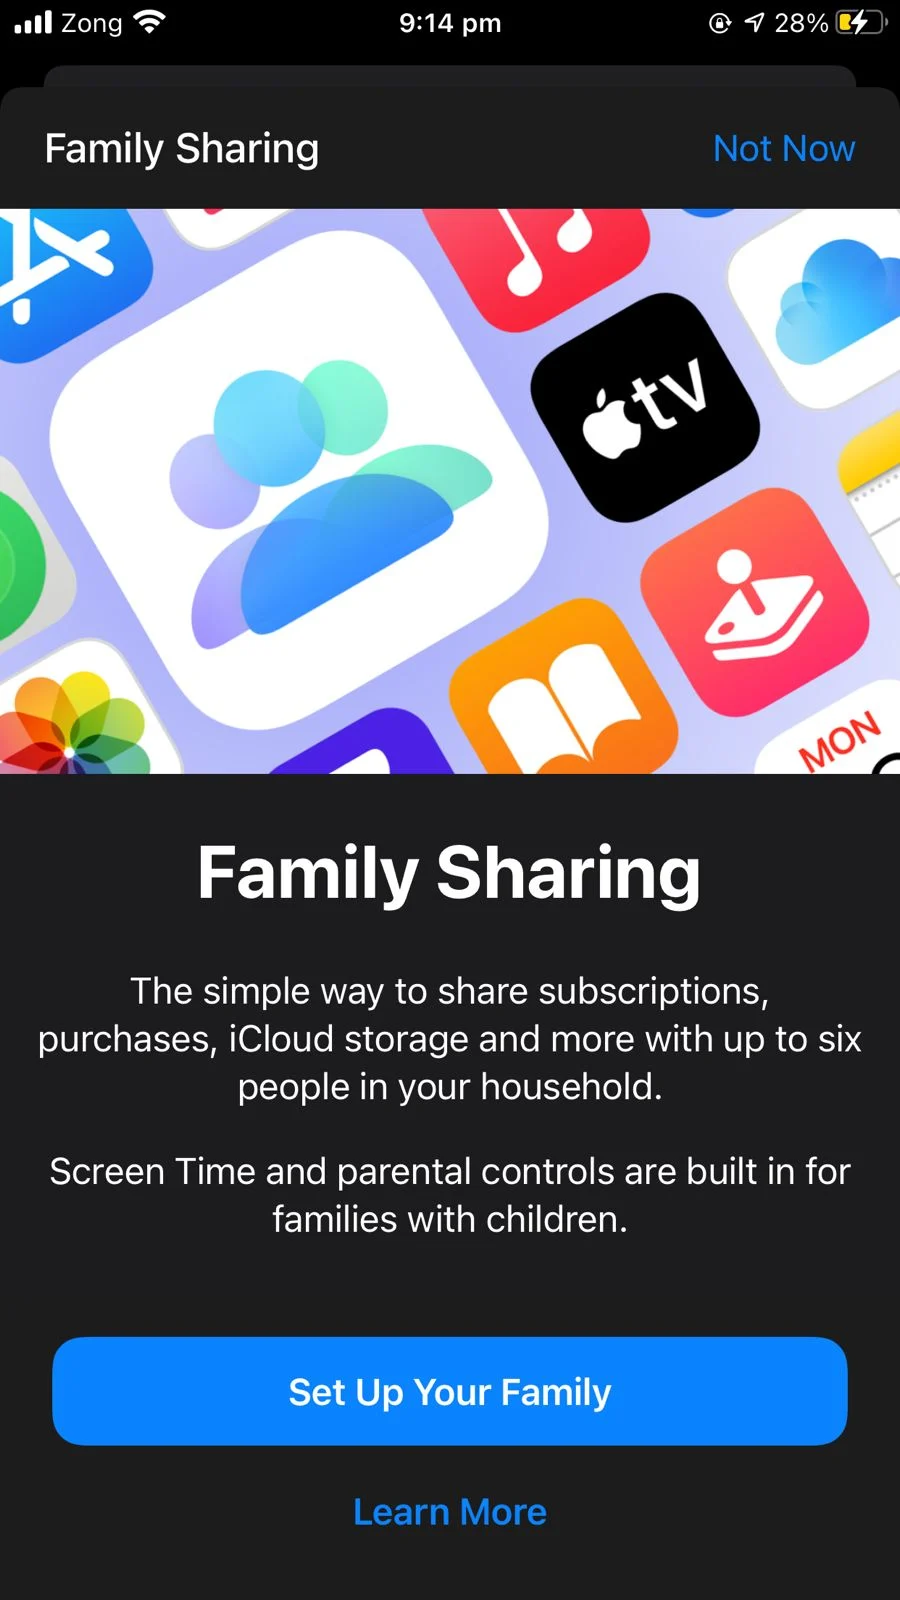
To set up a family sharing account, go to Settings > [Your Name]. Choose “Family Sharing” > “Set Up Your Family”.
Complete your account setup as instructed, then invite your family members to join in.

Workaround #2: disable iMessages in iCloud
Another way to avoid the combined message thread issue is to disable Messages in iCloud.
By doing so, you can continue sharing the same Apple ID but iMessage threads won’t be combined, since the conversations will no longer be synced to iCloud.
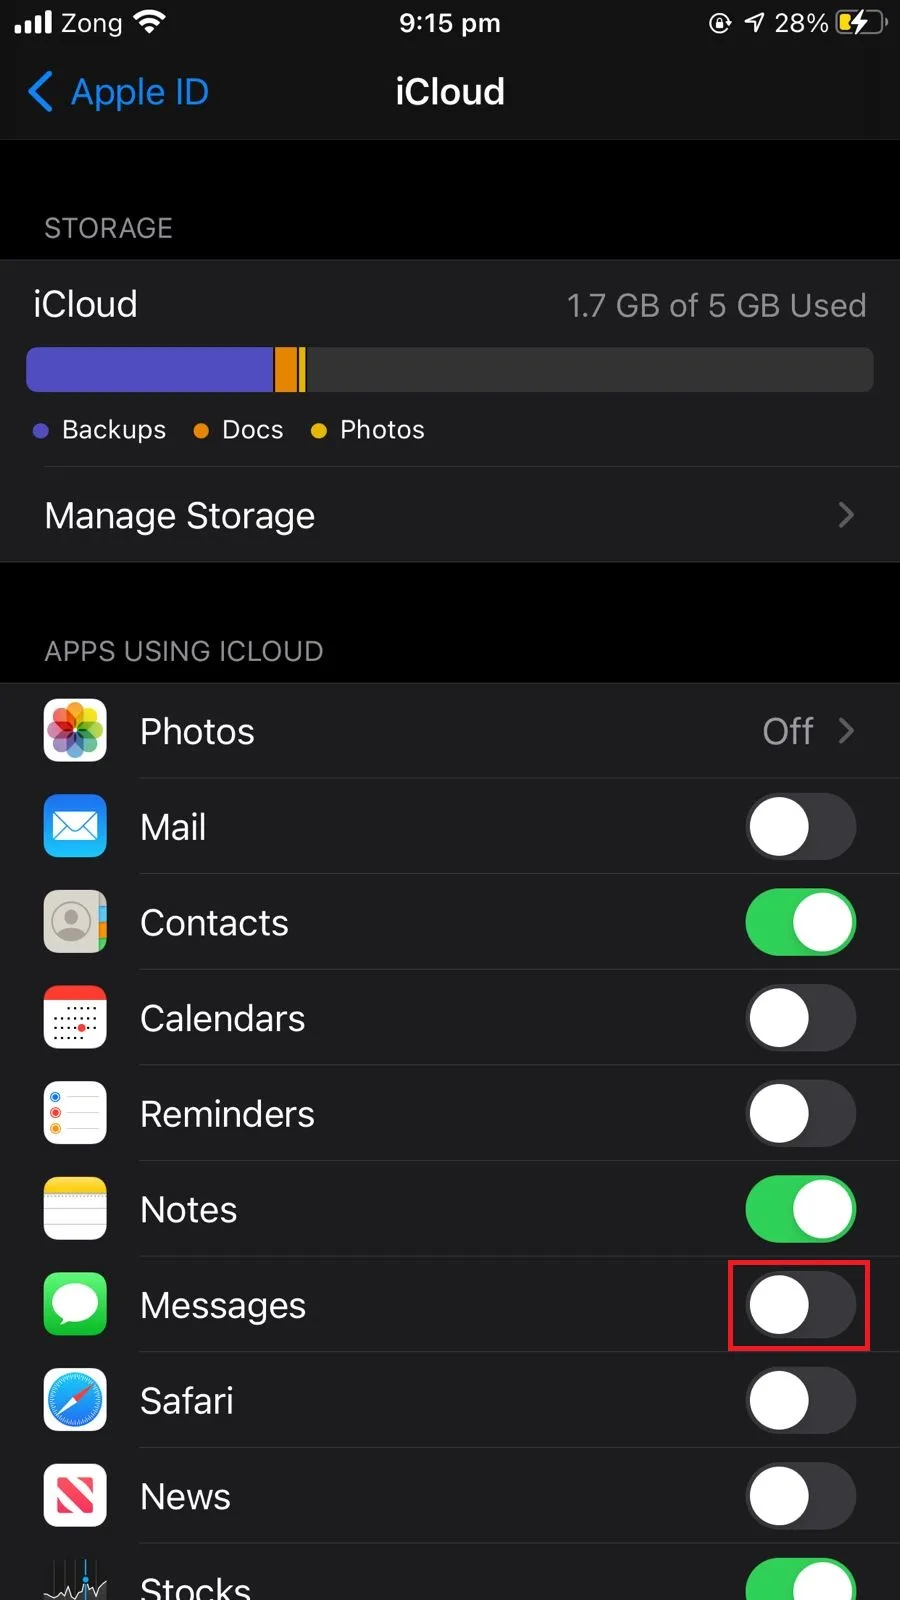
To do this, go to Settings > [Your Apple ID] > iCloud and toggle off Messages.

Workaround #3: disable Apple ID in message settings
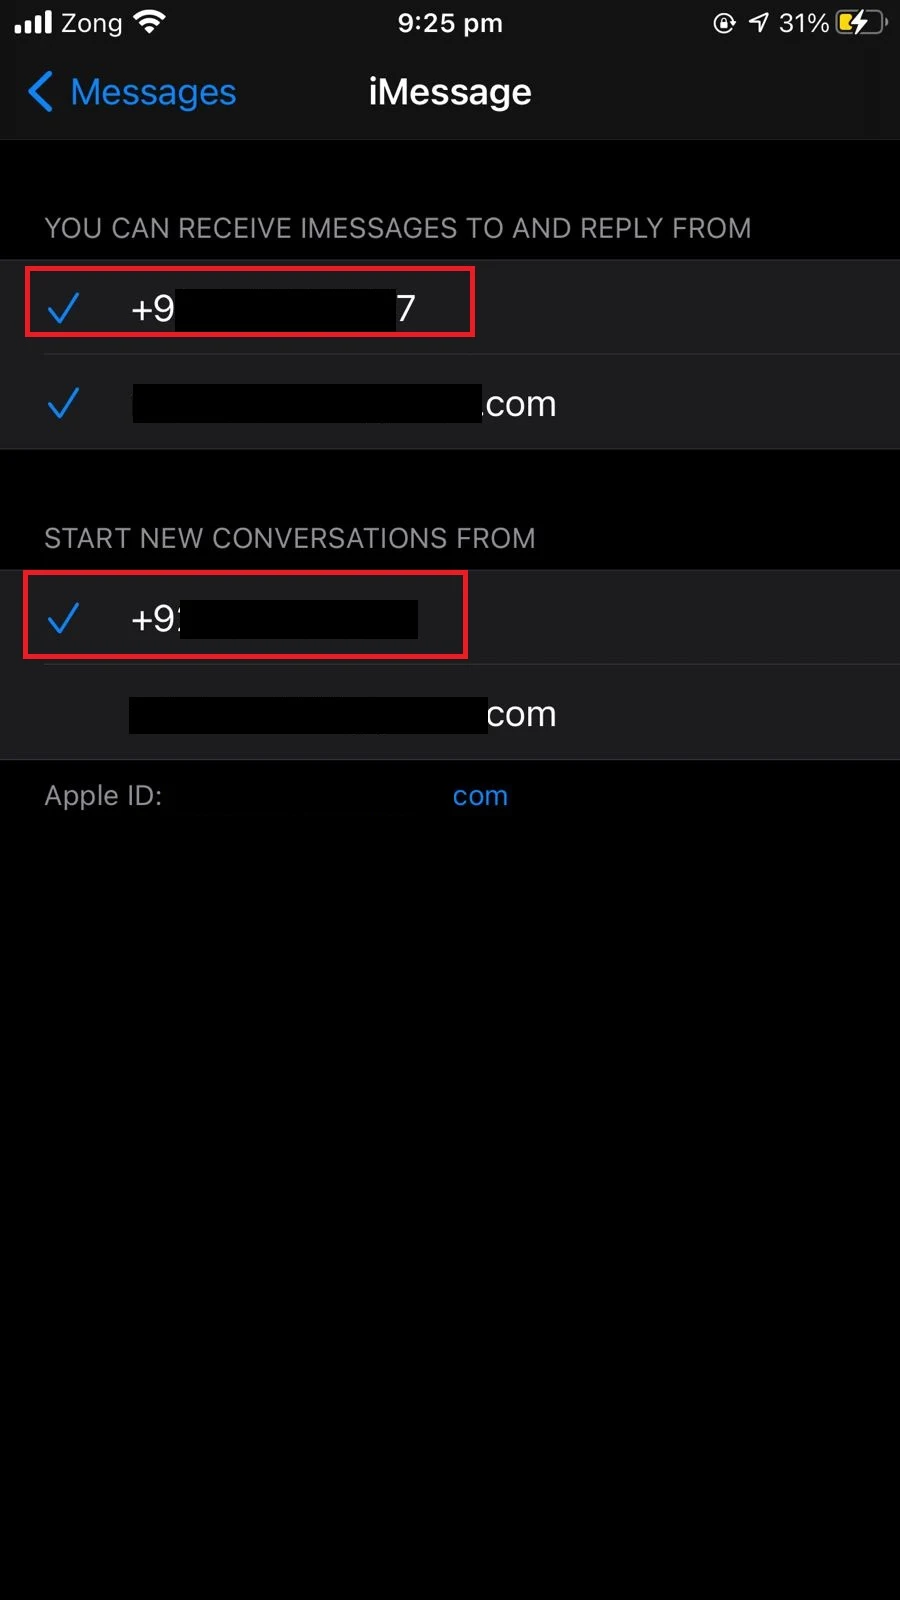
A third possible workaround for the combined iMessage thread issue is to use your phone number instead of an Apple ID for Messages and iMessage in settings.
This will allow you to send and receive messages through your personal phone number instead of using the shared Apple ID.
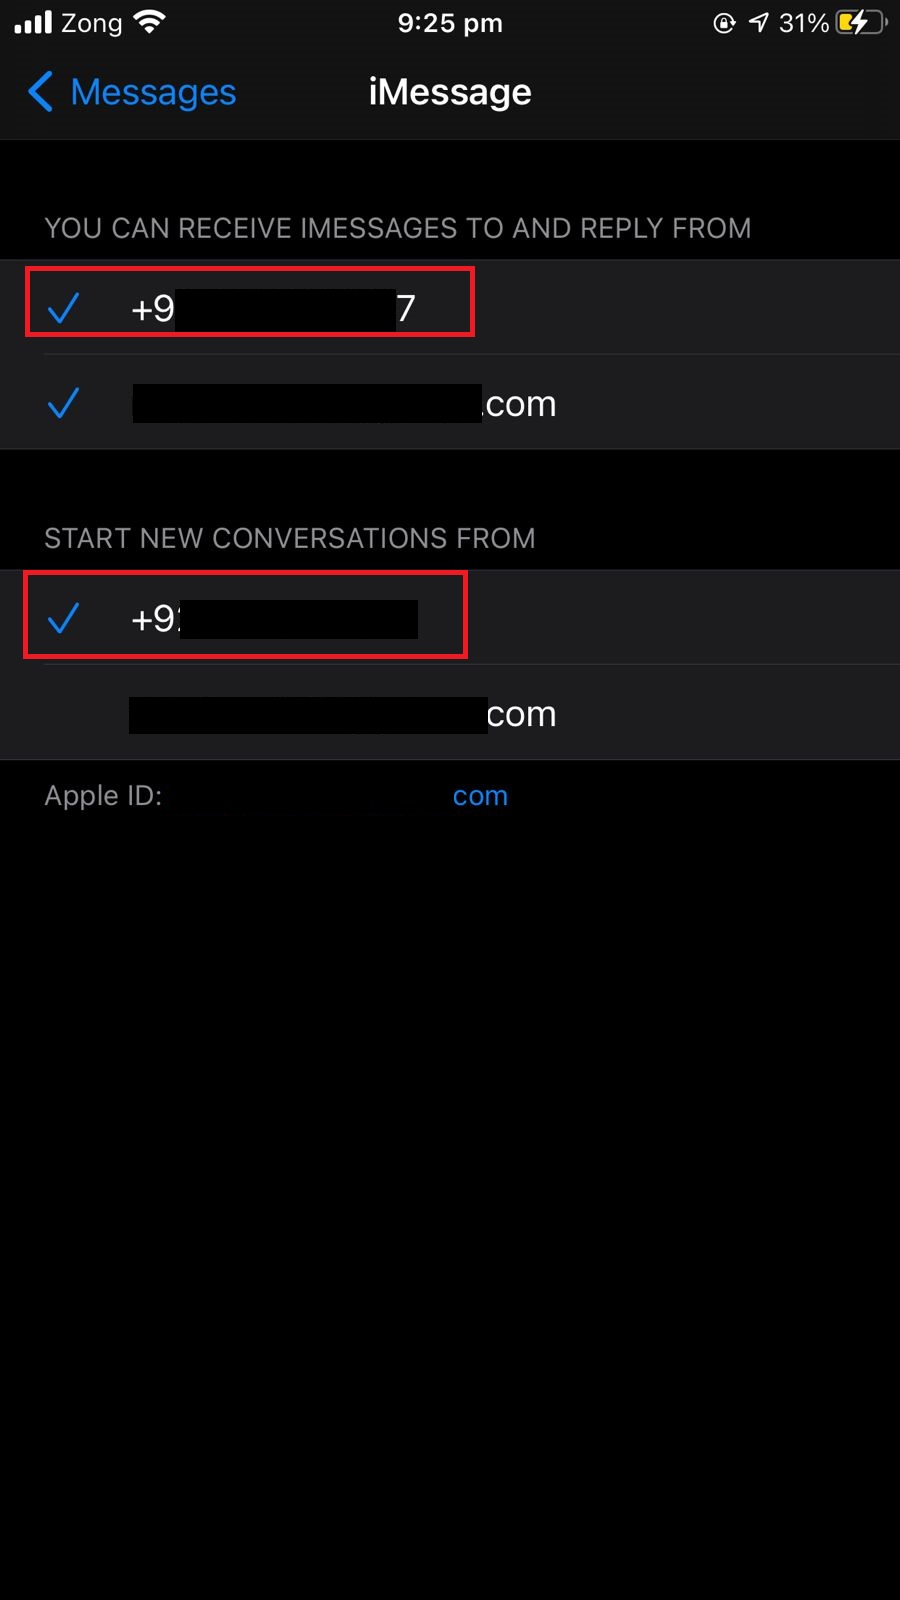
Go to Settings > Messages > “Send & Receive”. Choose your number instead of Apple ID for both sending and receiving, as well as for “Start a new conversation from”.
Workaround #4: create a new Apple ID for iMessage
If you wish to continue sharing your Apple ID with someone so as to share store services, calendars, photostream, etc, to avoid your iMessages being combined, you can also create a new Apple ID specifically for iMessage and FaceTime services.
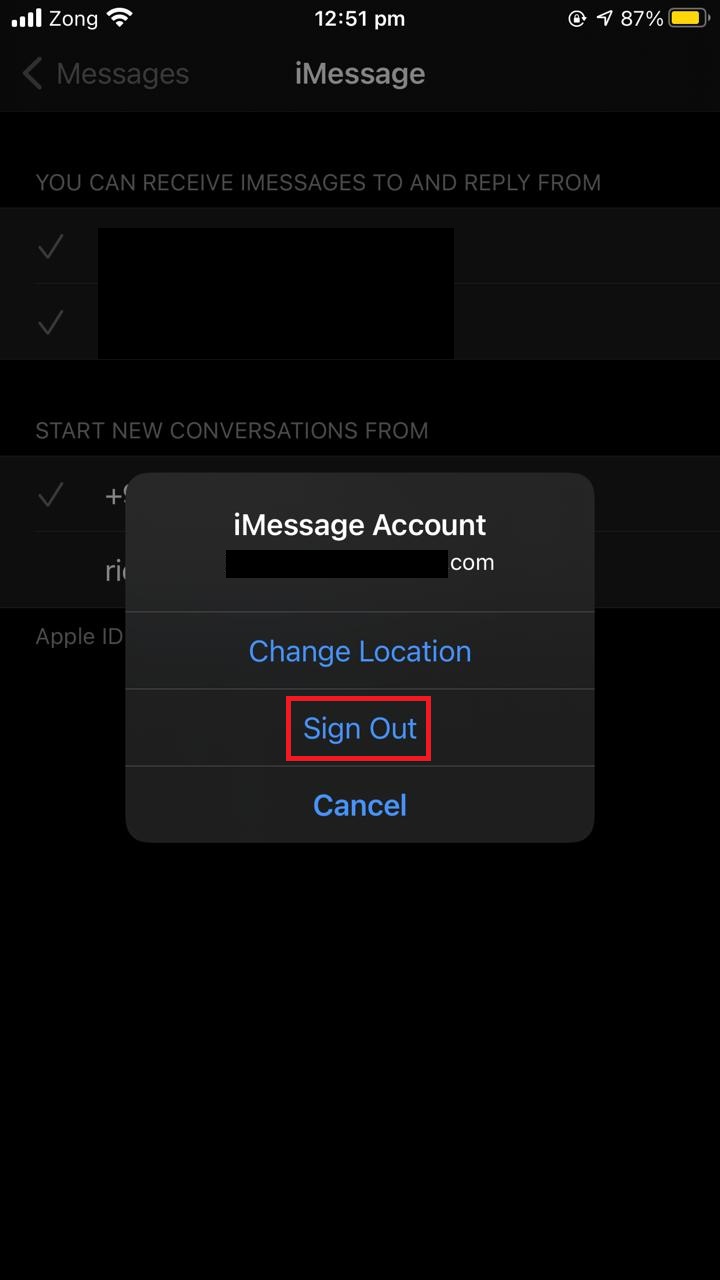
Open Settings > Messages > “Send & Receive”. Tap on Apple ID and sign out of your shared ID. Now create a new Apple ID and sign back in Messages using that new ID.
You can keep using your shared Apple ID for iCloud and App Store. To do that, open App Store > [Your Account] and enter your shared Apple ID to continue using it.
iMessage threads and Family Sharing
In the preceding section, we saw that setting up Family Sharing is one way to get around the iMessage thread merging issue. How does Family Sharing affect iMessage conversations?
Family Sharing does not have any effect on messages or calls. Each family member has separate contacts, calls, messages including iMessages and other private information. Tese things are not shared when Family Sharing is enabled.
To set up Family Sharing, each family member need to have a separate Apple ID. As a result, iMessage threads are never combined using this setup.
What happens if I turn off iCloud contacts ?
We also mentioned turning off iCloud Contacts in an earlier section. Lets take a closer look at what happens when you do that.
If you turn off iCloud Contacts, you will be asked if you want to keep the contacts on your device or delete them. If you choose to keep the contacts, iCloud syncing for contacts will be turned off, but the contacts will remain on your device.
After turning it off, any new changes you make in contacts on your device locally will not be synced to iCloud. Therefore, if you create a new contact, it will not be updated in iCloud.
Likewise, if you delete a contact on your device, the contact will remain in your iCloud.
If you lose your iPhone, you will not be able to recover the contacts added in your phone after turning off your iCloud contacts . Also, with iCloud disabled, you can no longer access your contacts from any other device.
Duplicate contacts on iPhone
Opposite of the merging contacts issue, you may have duplicate contacts on your iPhone. This could be caused by a recent iOS update, or it could result from setting up a new iCloud account.
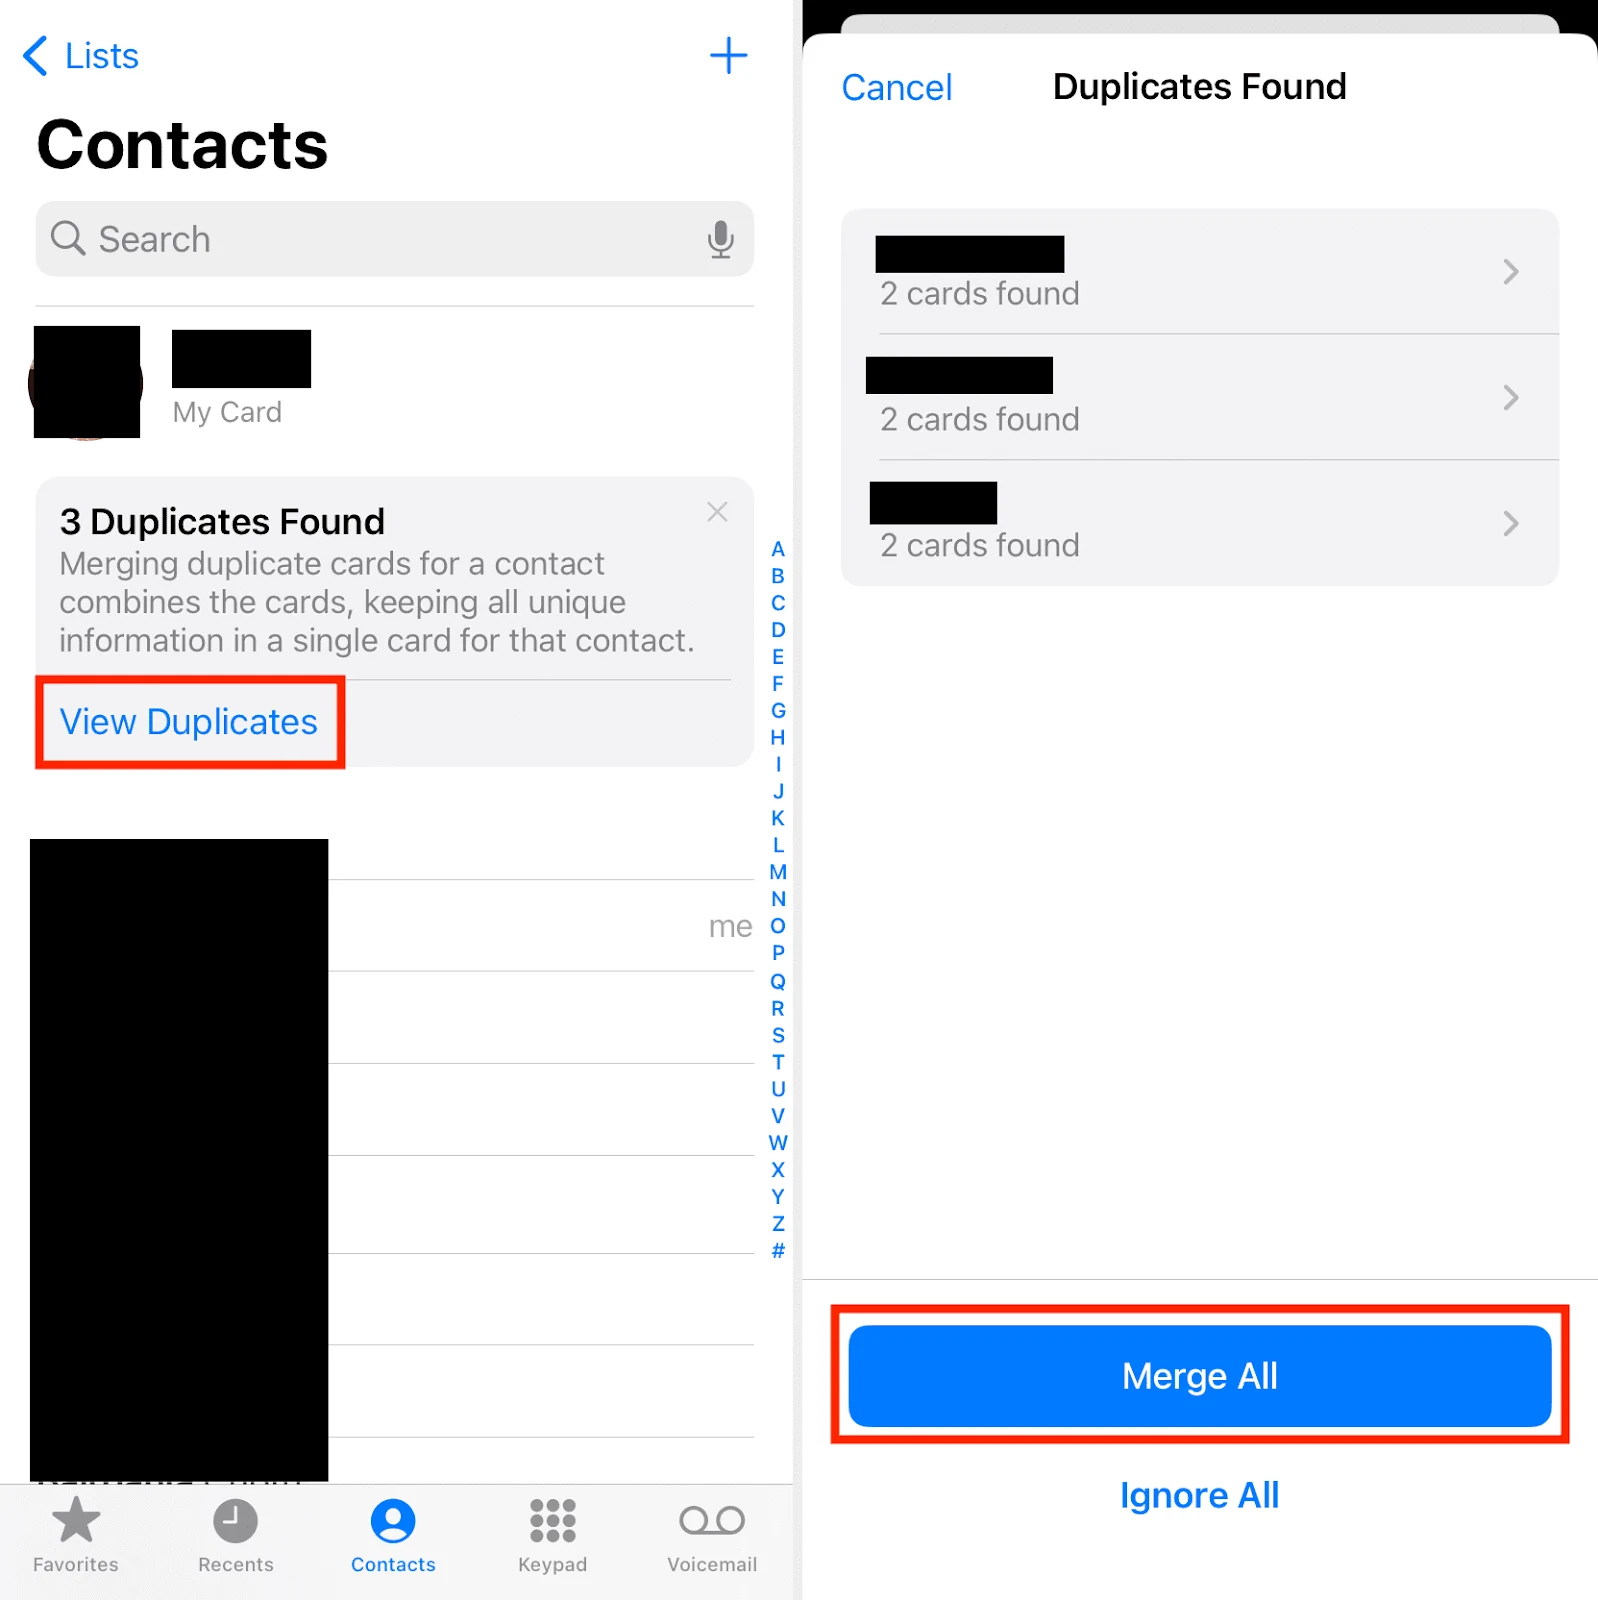
iOS 16 provides a quick and easy way to get rid of duplicate contacts. In the Contacts app, under “My Card”, you might see a “Duplicates Found” indicator showing whenever iOS detects other contacts with similar data in your iPhone list.
If you tap “View Duplicates”, you can review individual contacts and decide whether to merge them or delete them. You can also choose “Merge All” to merge all the duplicate contacts into a single contact.

If you are running iOS 15 or older, there’s no easy way to resolve duplicates. You will need to manually link your duplicate contacts, but you won’t be able to remove them from your Contacts.
The contacts will be linked together but will not be merged. They will continue to appear separately.
Open the Contacts app and tap on the individual contact you want to merge. Choose “Edit” at the top right corner. Scroll down and choose “Link”. Select the contact that you want to link the contact with and tap “Done”.