

Apple needs your phone number, or any trusted number, to associate with your Apple ID, which is critical in case you forget your Apple ID credentials.
Although the process of verifying your phone number is relatively straightforward, there’s a chance you might run into issues leading to unauthorized access to your Apple ID.
Read on as we discuss the possible problems that may arise while trying to verify your iPhone with your Apple ID, and also take a look at their solutions.
- How do I verify my phone Number on New iPhone?
- Why is iMessage stuck on verifying my phone number?
- How Do I Verify My Phone Number for FaceTime?
- How Do I Verify My Phone Number With Apple ID?
- Apple Verification Code Not Received?
How do I verify my phone Number on New iPhone?
To verify your phone number on your new iPhone,go to your Apple ID and add it as a trusted number. The procedure then requires you to type in the verification code sent to your iPhone when prompted.
However, there’s a chance that you won’t receive the code due to some glitches.
Although this may seem like a significant problem, you can actually resolve it quite easily in a few minutes. Solutions like resetting your network settings to default or restarting your phone will probably fix the issue. However, in the worst-case scenario, you might need to perform a factory reset.
How do I Get rid of iPhone verification failed?
Verifying your phone number protects your Apple ID even if your password is leaked in case of a data breach. With that said, an error can occur leading the verification to keep failing. Fortunately, there are a number of ways you can use to fix this:
Reset your network
The services provided by Apple require a steady internet connection, without one, these services will cease to work. First make sure that you’re connected to the internet.
If your internet connection is fine and the problem persists, try resetting all your personalized network settings to default. This may fix any bug or conflicting software causing the verification issue. Here’s how:
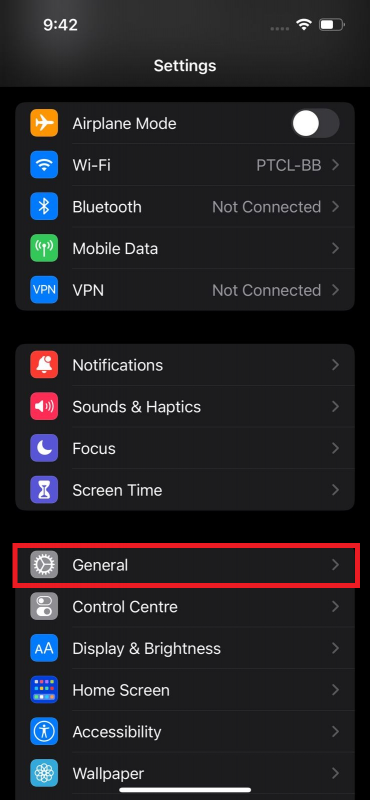
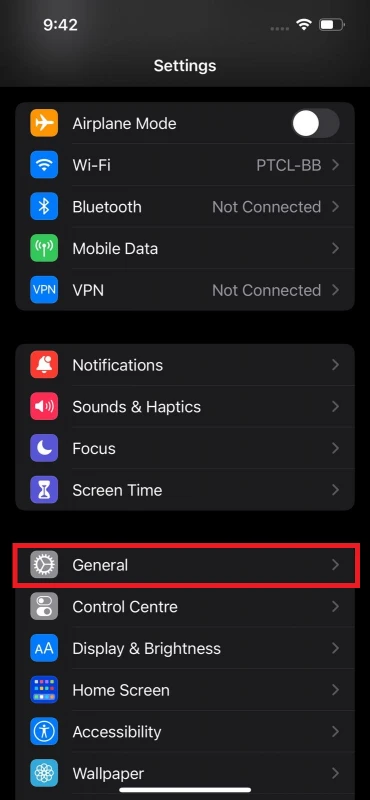
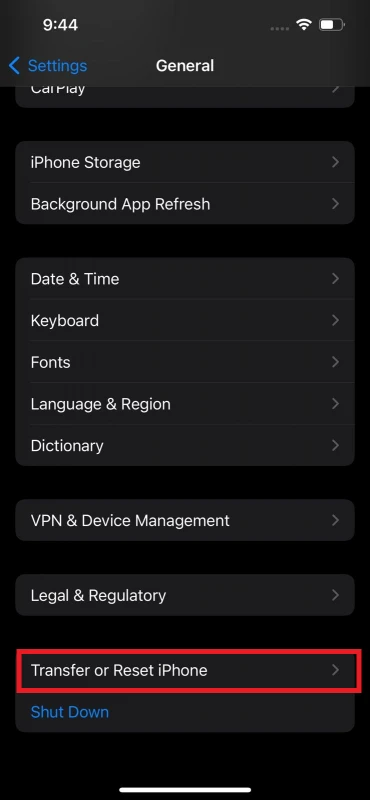
- Open Settings > General > Transfer or Reset iPhone
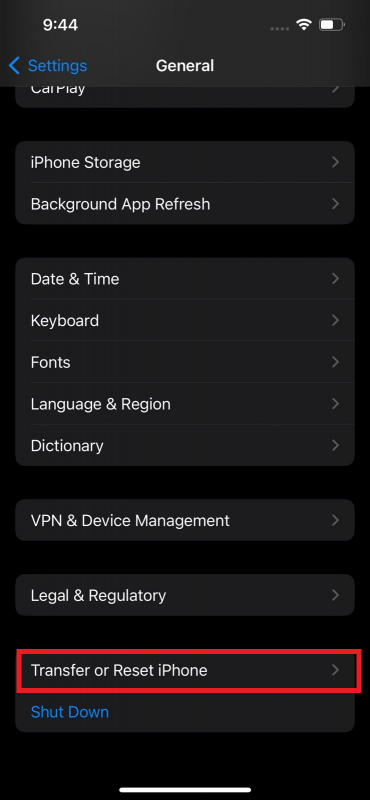
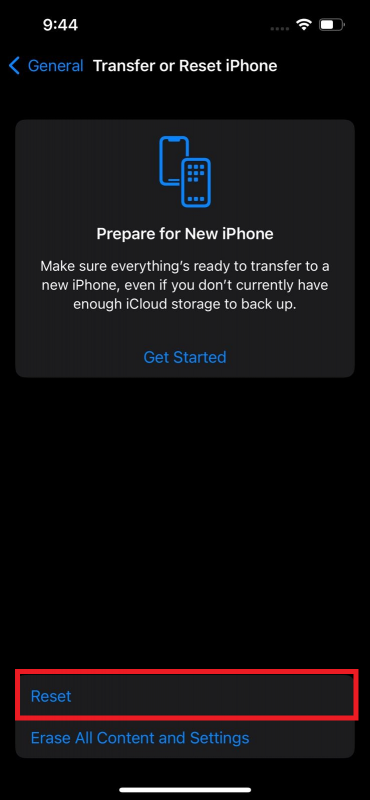
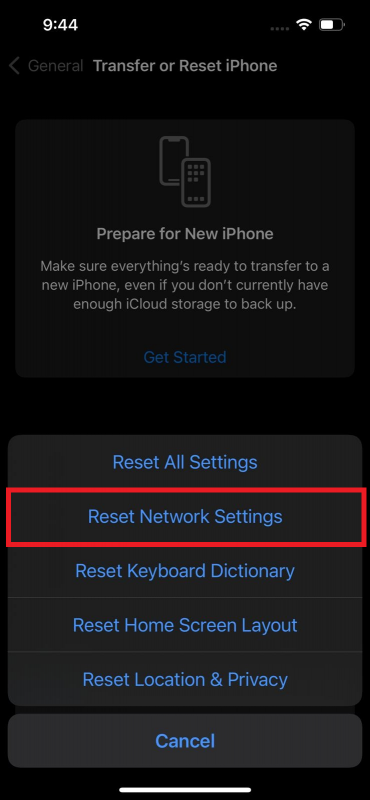
- Then press Reset > Reset Network Settings
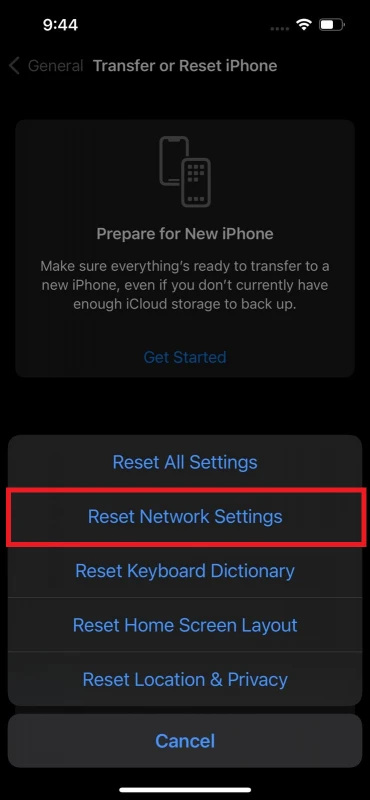
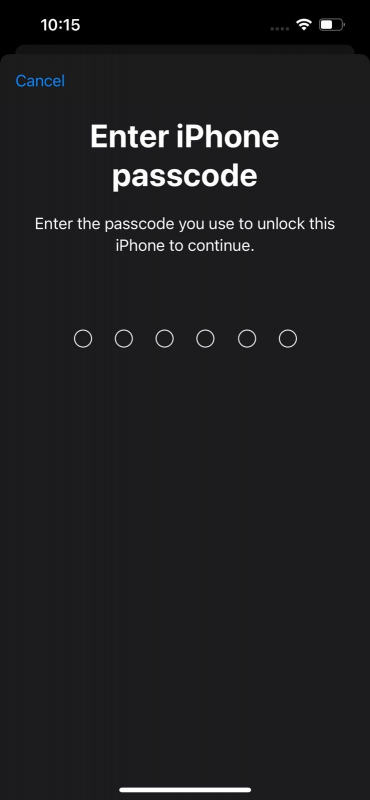
- Provide your passcode if prompted
- Click on Reset Network Settings
Apple server
There’s a chance that the Apple servers may be down or are undergoing planned maintenance.
If resetting your network settings didn’t work for you, check out Apple’s official website for any scheduled maintenance or any problem with the server.
To check the status of the servers, go to the website and see if any services are listed in yellow.
VPN Connection
If the server seems to face no issues and the problem still persists, your phone may be connected to a VPN, which may be causing the “Verification Failed” error.
A VPN can override your network settings, which may lead to your phone number failing to verify.
Check if your phone is connected to a VPN by following these steps:
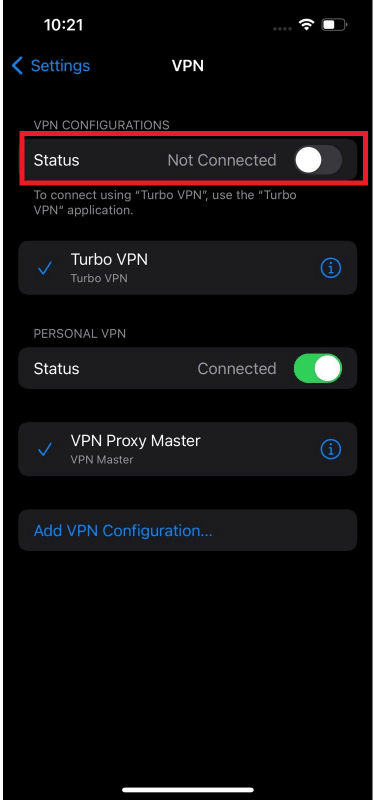
- Go to Settings > VPN
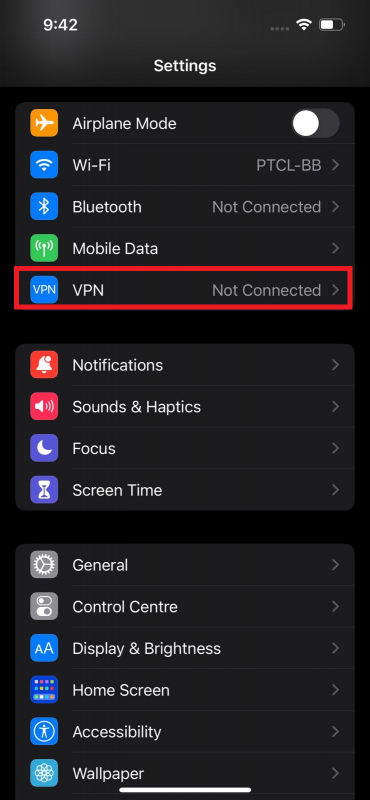

If it says ‘Connected’ on the far right of the VPN tab, you can turn the connection off by clicking on the VPN tab and toggling the status to “Off”. You can also try restarting the connection to see if it fixes the problem.

Updating your software
Software updates are usually launched to fix various bugs that arise from conflicting apps.
Therefore, by updating the software of your iPhone, you can often fix many errors that may emerge in your phone, including the “Verification Failed” prompt.
Follow these steps to update your iOS to the latest version:
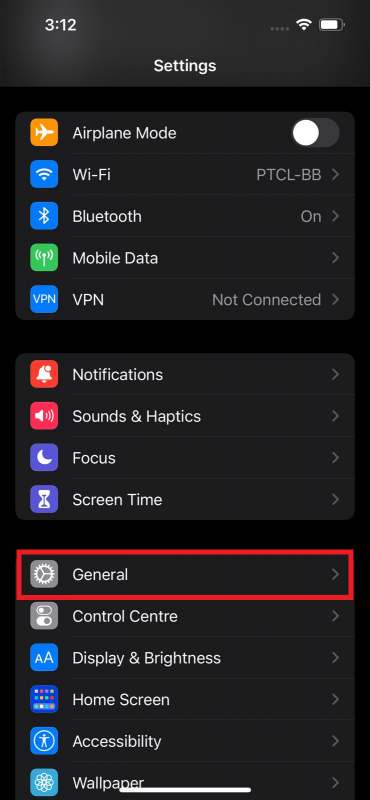
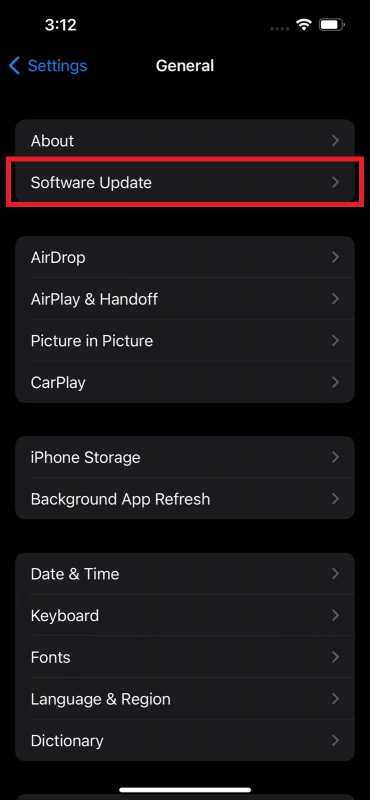
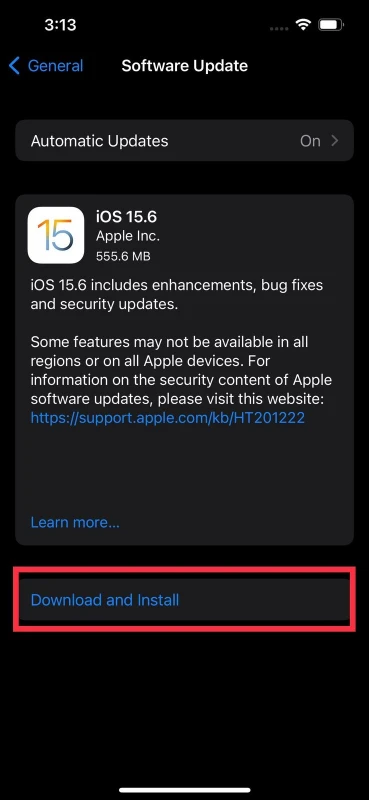
- Go to Settings > General >Software Update.


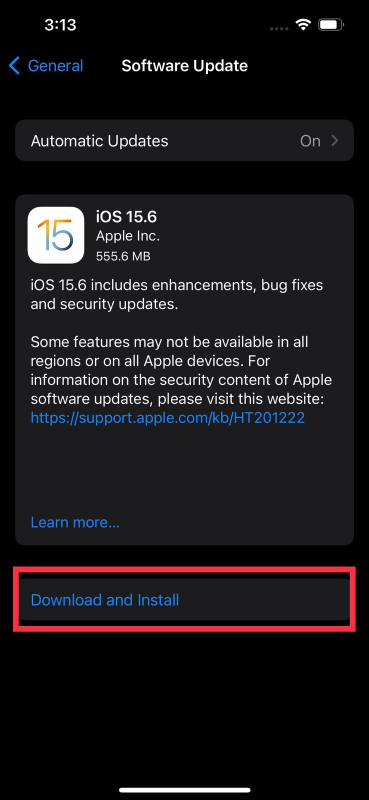
- If there’s an update available, a “Download and Install” button is displayed underneath.
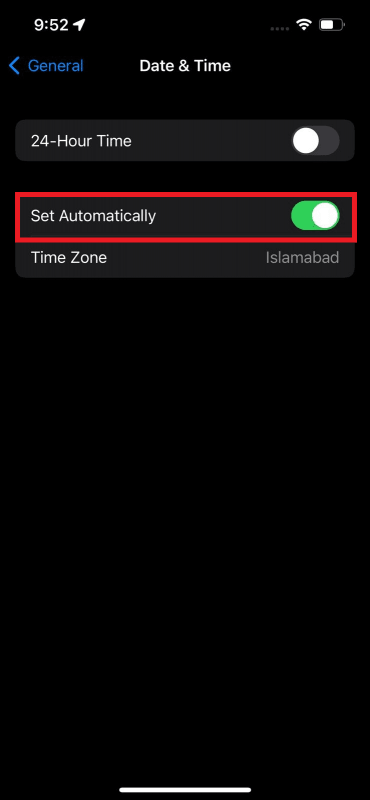
Setting date and time
Many iPhone users report that changing their iPhone’s location and timing settings lead to some problems, including the ‘Verification failed’ error.
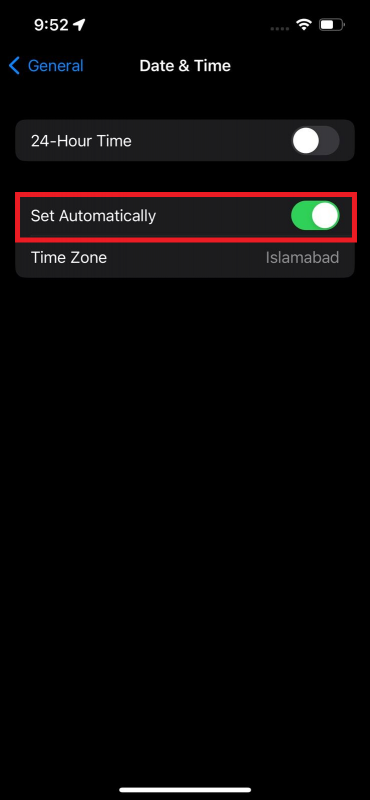
A quick fix is to set your “Date and Time Settings” to be adjusted automatically.:
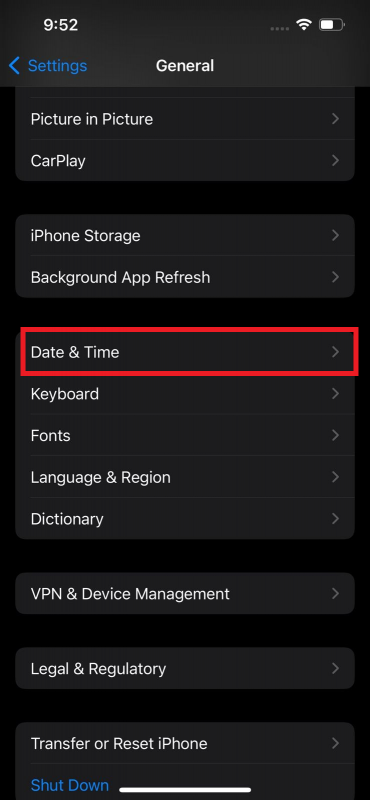
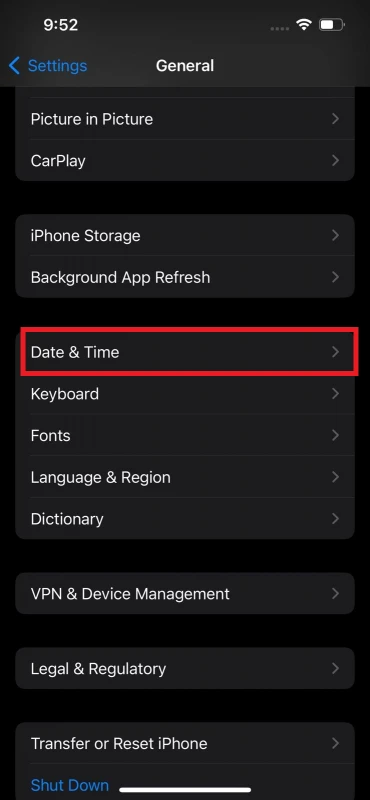
- Open Settings > General > Date & Time
- On the Date & Time screen, click on “Set Automatically”.
The sim is not inserted right
If the verification error persists, it may be because your sim is inserted in the wrong orientation. This often leads to your phone not detecting the sim and hence displaying relevant error messages.
To fix this, take out the sim tray and re-insert the sim into the slot. Following the indentations on your sim card, you’ll be able to figure out the correct orientation for your sim.
Make sure to firmly press in the sim tray once you’re done to make sure it’s securely clasped in and doesn’t fall out.
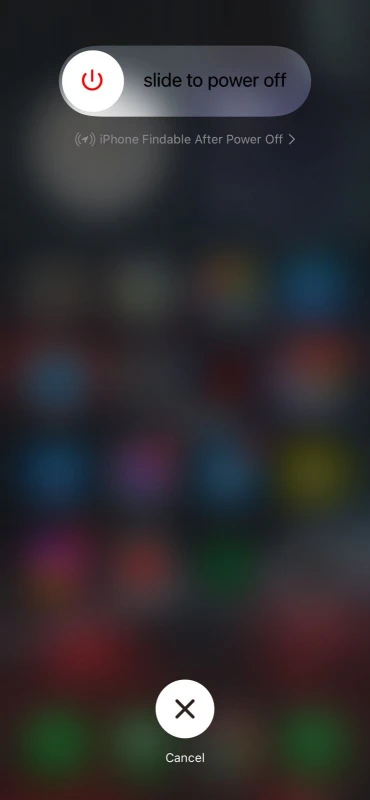
Restart your iPhone
When you restart your iPhone, any software which is stuck in its current state or is malfunctioning restarts from scratch. This can sometimes help reset conflicting software that may be preventing your iMessage from verifying your number.
Here’s how to restart your iPhone:
- Press and hold either volume button until the “Power Slider” appears and swipe it to the left to turn your iPhone off.
- Then press and hold down the ‘Side’ button to turn your device on. An Apple logo will appear on your screen showing that your phone is about to turn on.

Get your iPhone checked by apple
If even after trying the above solutions doesn’t fix the verification code error, you need to take your iPhone to the nearest Apple center for repair. Apple will diagnose your phone for any possible hardware-related issues that may be causing the error message.
Why is iMessage stuck on verifying my phone number?

iMessage is a messaging service provided by Apple which uses the internet to send messages across iPhones. To set up iMessage, you need to have access to an Apple ID linked with a phone number.
The phone number you provide will receive a verification code that you can use on your iPhone.
If you’re not receiving the verification code on your SIM, it’s likely due to a software issue that can be fixed using the methods explained earlier.
It’s also possible that you haven’t activated iMessage with your phone number properly through your iPhone settings.
How do I activate iMessage with my phone number?
iMessage can be activated in two ways; either through an Apple ID or through a phone number. If you’re choosing the latter, make sure that your phone number has been activated by your carrier.
For the process, you’ll also need internet access either via an active cellular or Wi-Fi connection. Once all this is ready, here’s what you need to do:
- Open Settings > “Messages” > toggle on ‘iMessage’.

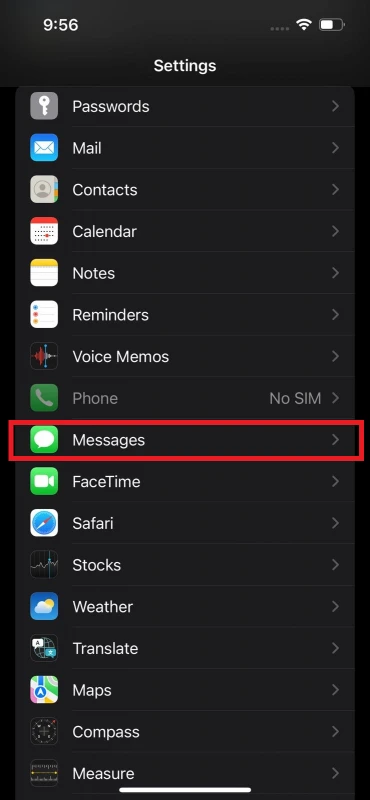
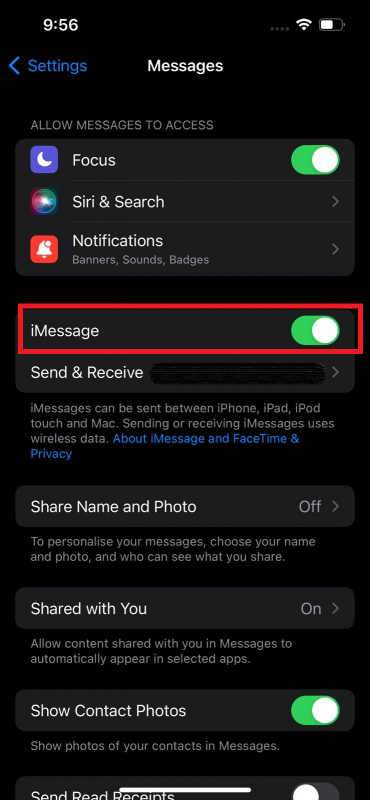
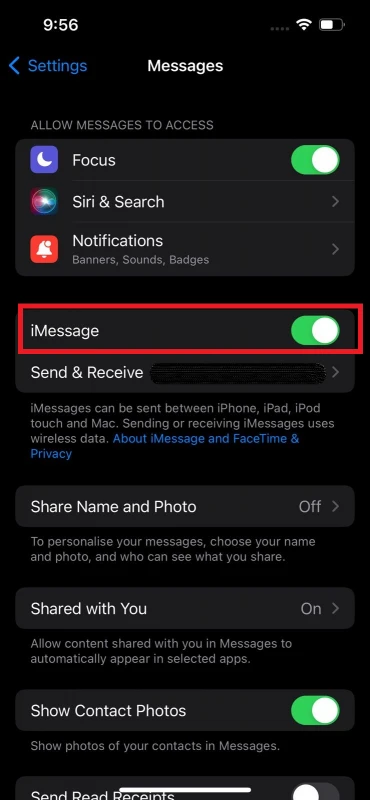
- After it has activated, tap on “Send And Receive”.
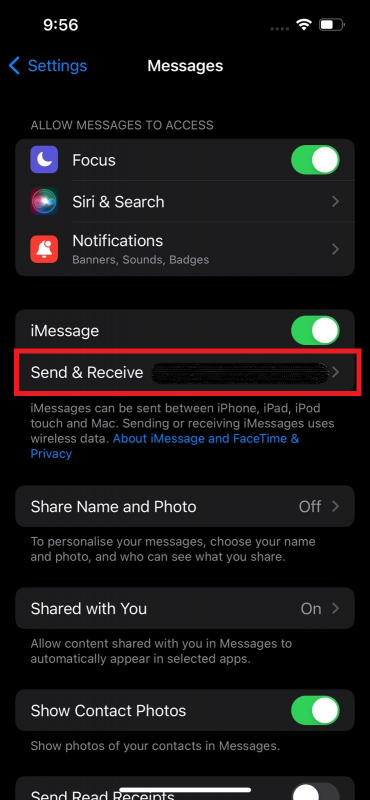
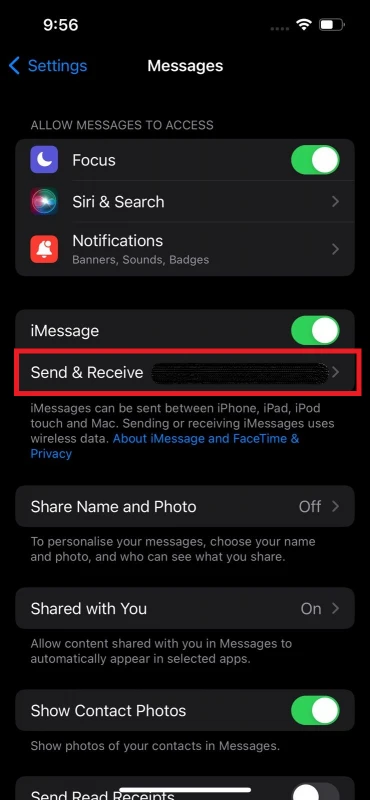
- Tap “Use your Apple ID for iMessage” and sign in with your Apple ID.
- Then select the “You Can Receive Messages” option and make sure your phone number is selected with your Apple ID.


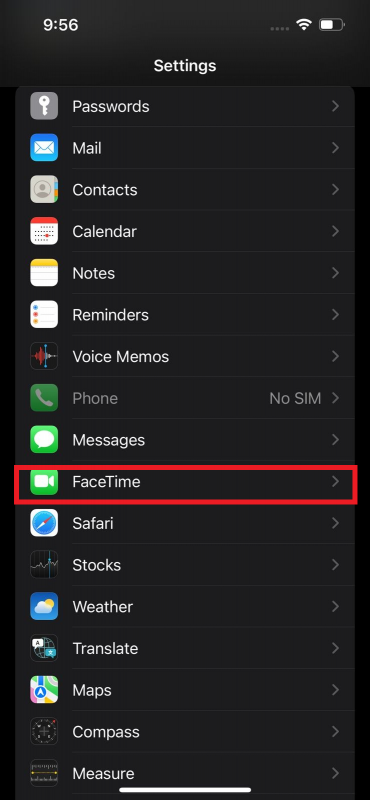
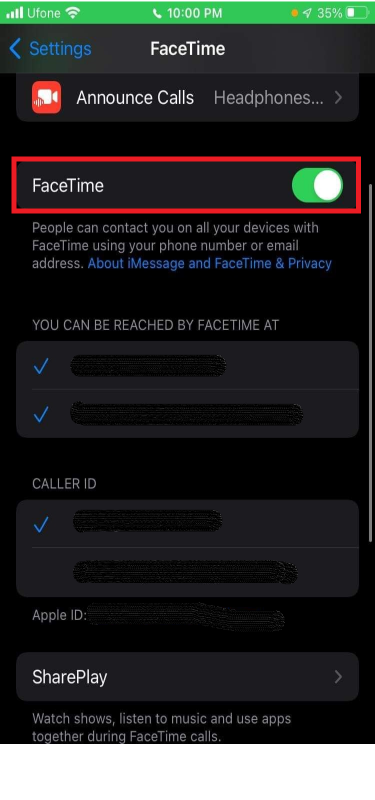
How Do I Verify My Phone Number for FaceTime?
FaceTime is an audio and video service Apple provides to iPhone users. However, to use the service effectively, you need to verify your phone number first.
To do this, first, you will need to complete all the four steps needed to activate iMessage which were explained earlier. After that, follow this additional step:
- Go to Settings > FaceTime and select your phone number as well as Apple ID in the “You can be reached by FaceTime at” section.

Why is FaceTime stuck on verifying?
FaceTime may also face the same issues as iMessage when verifying your phone number.
This can happen e.g. when you travel to a different location and haven’t updated your iPhone’s time and location settings.
To fix this issue, follow the solutions mentioned in the section “How Do I Get Rid of iPhone Verification Failed?”.
How Do I Verify My Phone Number With Apple ID?
Apple needs your phone number in order to set up two-factor authentication to prevent any unauthorized access to your account.
This added security layer helps keep your data very secure on your side, ensuring that even if someone has access to your password, they can’t log in without the verification code sent to your personal SIM number.
Here’s how to verify your phone number with Apple ID:
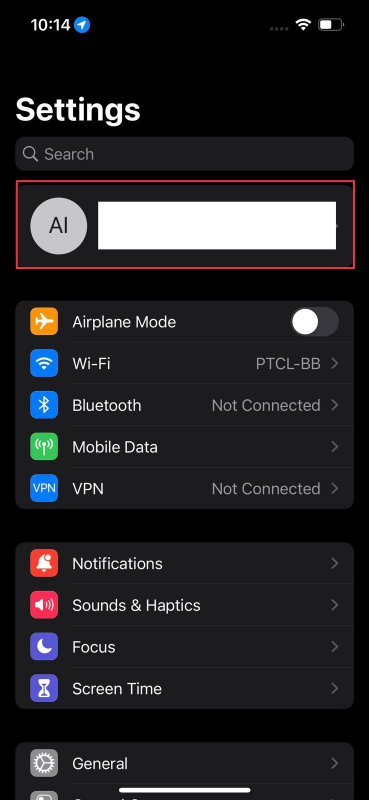
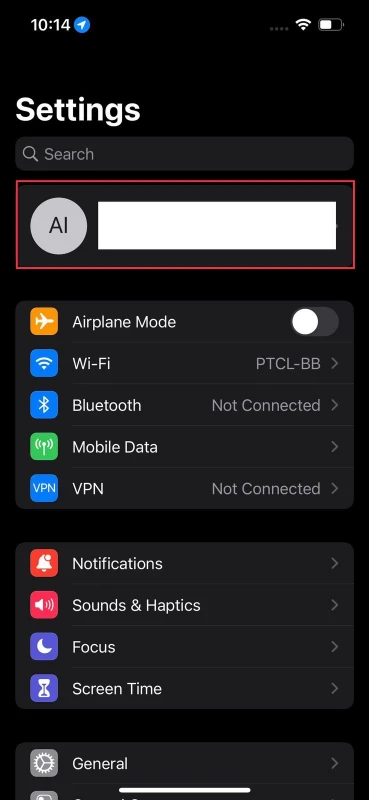
- Go to Settings and tap on your Apple ID.
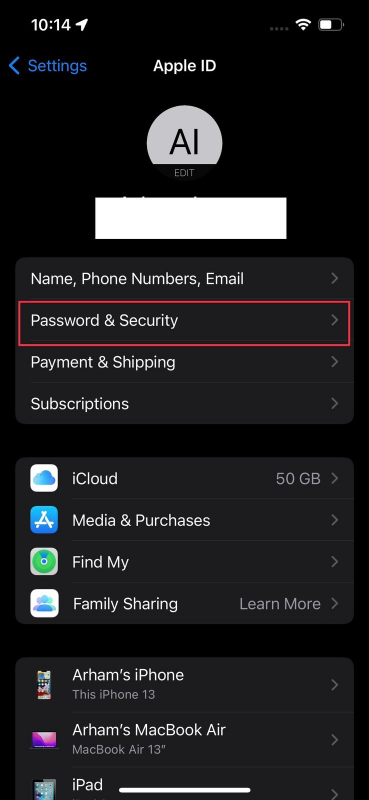
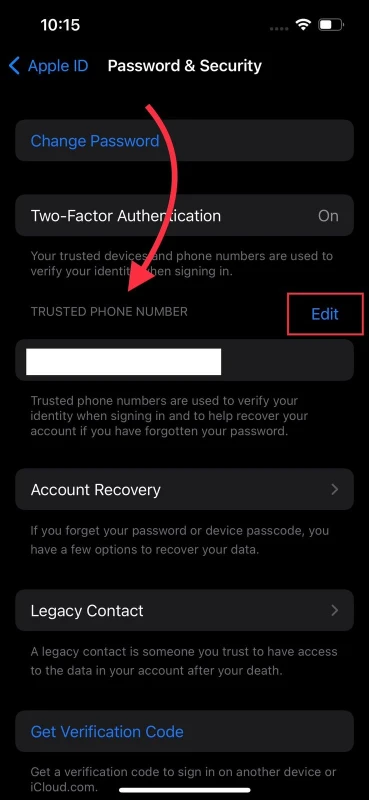
- Go to “Password & Security” > tap ‘Edit’ under the “Trusted Phone Number” tab.


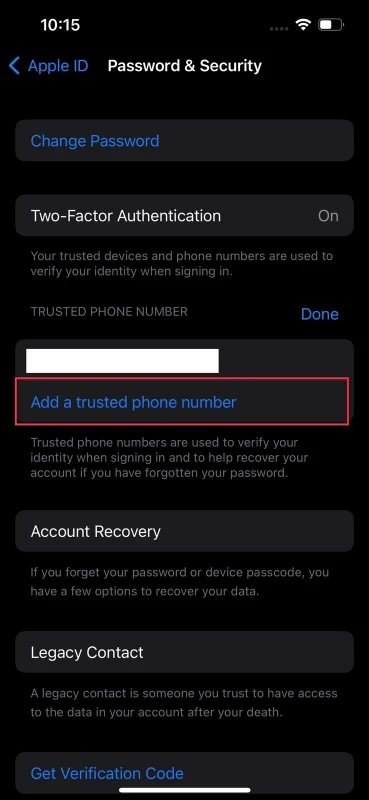
- Press “Add a trusted phone number.”

- Select the country code, add your number and select how you want to verify your number
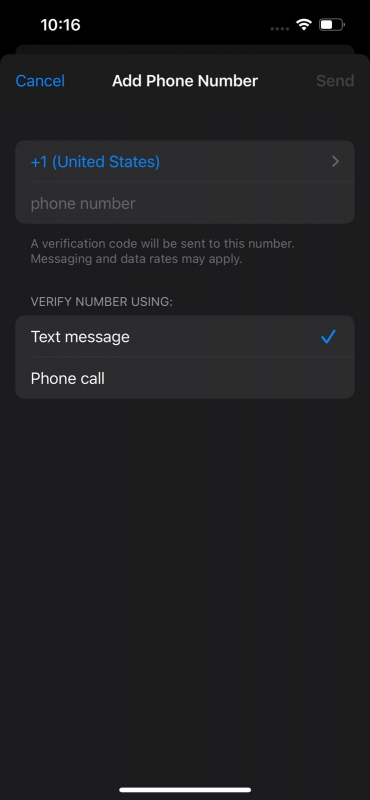
- Type the verification code received on your number. Enter the passcode if prompted.
Apple Verification Code Not Received?
If you’re not receiving a verification code on your iPhone, it is probably because you haven’t set up two-factor authentication on your device.
If you have already done that and still aren’t receiving any verification codes, try the following fixes:
Additional Device
When you set up two-factor authentication, whichever device you log in to your Apple ID on will be considered a trusted device.
If you wish to verify your phone number on your iPhone but can’t access the SIM card to receive a verification code, you can add a second trusted device to work for you. Here’s how:
- Go to Settings and tap on your Apple ID.
- Go to “Password & Security” and tap ‘Edit’ under the “Trusted Phone Number” tab.
- Press “Add a trusted phone number.”
- Select the country code, add your number and select how you want to verify your number
- Type the verification code received on your number. If you didn’t receive the code on your phone, choose “Didn’t get a code”.
- Select where you receive the code on your trusted number.
- Receive the code on your device and enter in.
Receiving Verification Code Via Settings
If you can’t access the internet on your trusted device and still want to receive a verification code, here’s what to do:
- Go to Settings > [Your Apple ID] > Password & Security
- Tap on “Get Verification Code”.
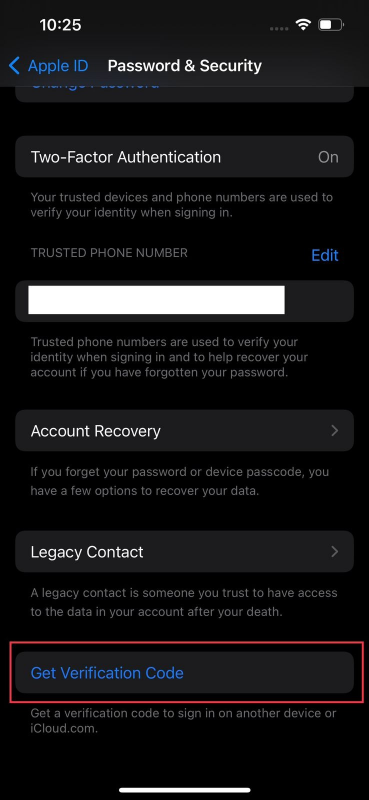
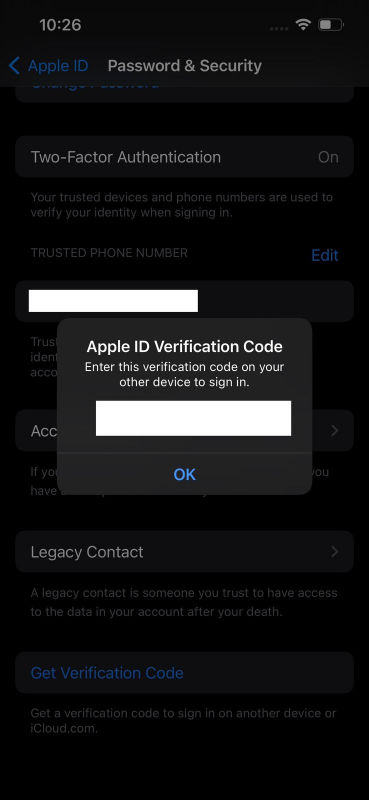
- In the prompt that appears, press “Get Verification Code” again.
- See also: Why Am I Not Getting Verification Code On My iPhone?